

Gaston
-
Posts
571 -
Joined
-
Last visited
-
Days Won
5
Content Type
Articles
Profiles
Forums
Gallery
Events
Downloads
Posts posted by Gaston
-
-
4 hours ago, crimzzen said:
Would you guys see any merit in hiring Lucius into the crew?
It was a better idea when Teddy was a Minion.
-
Some agreement, some disagreement.
Geryon: Concur that Shoulder Rush is overly complicated.
Bultingun: Played them quite a few times, and they have performed their role well, no complaints.
Aversion: Played them quite a few times, and they have been great each time. They are especially good at schemes that require positioning in a certain spot, such as Claim Jump, Take Prisoner, or Idols (Antipathy to make it harder on enemies, and Scatter has no resist).
Sorrows: Played them quite a few times, they are surprisingly fast scheme runners, able to teleport to a fast friendly model (i.e. Hooded Rider) in a Pandora crew. Consider in 1 AP they can move 11ish" (8 + 2 for large base + 1 for small base).
-
Woes had a similar issue, they corrected by giving Pandora a Woe only buff ability in order to tie the keyword a bit closer together.
-
11 hours ago, Erik1978 said:
All my games except 1 we've played the game to end. I find it more rewarding to play the entire game than stick to some 2 hour deadline for no apparent reason. It's expected the games will take longer at first. Of course you need to HAVE the time to spare and all that.
")
Things are often critical in turn 4-5 so it would be a shame to quit after 3 turns IMO. Plus, it's MALIFAUX, it's always a shame to quit.

We play on weeknights, and I am old and have a bedtime.
I feel we definitely made different choices based on knowing time was up, i.e. I would unlikely have scored Claim the second time, bc Parker could have just picked on Treebeard, and rather than Delivering the Message the Emissary would have killed Sue off.
-
 1
1
-
-
It had very minor appeal, it triggers positive flips on Alp attacks, easier to bury on a friendly.
Enemy only is fine.
-
 1
1
-
-
How did game time feel? 4 hrs for 5 turns?
-
10 minutes ago, Erik1978 said:
I assume you mean you hit him with a tome trigger to then push into an ice pillar and come out at another one? Did you feel this was a viable tactic? At least 2 damage on a model that also uses wounds if he wants to use Old Ways, and is a big Df 5 target.
Too bad you don't play 5 turns in spite it taking more than 2 hours.
Yep, used a whatever number Tome and relented the duel. I find it quite viable, provided you do it later in the turn or in such a way they don't get hit hard when they pop out. The Cyclops who got pushed was incorporeal, so only took 1 damage and Frozen Vigor'd back up the following turn. Geryon took 2 damage, but was able to eat the ice pillar he popped out of.
I have made it to Turn 5 twice in all of M3E.

-
This was actually my 3rd game with Euripides since the Open Beta launched, the battle report form just makes it so easy to be lazy with write-ups. Previous games were Dreamer (ended Turn 3, 3-3, looking back for Euripides) and Wong (ended Turn 3, 3-3, looking really bad for Wong). Special thanks to @Kolath for terrorizing me with Parker.
Today’s game was:
Wedge Deployment
Plant explosives
Take Prisoner
Claim Jump [Emissary]
Search the Ruins [Parker]
Power Ritual [Parker]
Deliver a Message [Euripides]Euripides, 4ss
-Primordial
Cyclops
Cyclops
Mysterious Emissary
Geryon
-Inhuman Reflexes
Gigant
GigantParker, 5ss
-Doc
Convict Gunslinger
-Wanted Criminal
Mad Dog
Midnight Stalker
Sue
Bandito
BanditoTurn 1 Summary:
Euripides stones for cards, everything he drew is the wrong suit. Banditos, Convict Gunslinger walk and scheme around. The Cyclops lay down some early game ice pillars. Mad Dog puts down a Blown Apart marker to deny me cover from the central stack of containers. Euripides teleports up and drops some pillars, pushes one into Mad Dog for 2 damage. Parker puts 2 damage back on Euripides. Emissary walks up and pops the Gunslinger for 3 damage and drags him into hazardous terrain. Doc does the healing! Gigant pushes the Geryon into an ice pillar, he pops out next to Mad Dog. Geryon puts 6 damage onto Mad Dog, he stones for 5 of it, then Geryon eats an ice pillar for a snack. The final Gigant teleports the other Cyclops to a pillar near a Bandito on the left flank.
Turn 2 Summary:
Geryon starts off the turn by charging through Mad Dog and popping him for another 8 damage total, 4 of which is stoned. Doc is not cool, and heals Mad Dog 3 wounds. The Emissary puts 3 damage onto Sue, the Convict puts 6 damage onto Geryon. Euripides teleports up, drops enough ice pillars to cause 5 Mv duels, then charges into Sue. Unfortunately, he misses his second attack, leaving Sue on 1 health. Mad Dog whiffs on the Geryon, the left Cyclops kills off a Bandito. Sue repays Euripides’s love with 9 damage! Parker is able to put another damage onto Geryon, dropping him to his last wound. Everything else walks, schemes, and drops some bombs off.
Eurpides: 2 (Plant Explosives, Claim Jump)
Parker: 1 (Plant Explosives)Turn 3 Summary:
Initiative is crucial this turn, there is a lot of cheating and reflipping, eventually Parker comes out on top. Sue kicks things off by finishing off poor old Euripides. Geryon gets some payback by Blade Rushing Doc, Parker, Mad Dog, and the Convict Gunslinger. He eats Doc to heal himself (and stop my opponent from healing). He then tries to do the same to the Gunslinger, but misses. The Gunslinger is not amused and kills off Geryon, cleverly using Chain Gang to circumvent Butterfly Jump. Gigant puts two shots into Mad Dog, killing him, then killing the Convict Gunslinger with blast and putting another 3 damage on Parker with blast as well. Parker tries to put some shots into the Gigant, but misses. Other models run schemes and bombs, Mysterious Emissary delivers a message to Parker, and Cyclops rounds out the turn by poking him for another 3 damage.
Euripides: 5 (Plant Explosives, Deliver a Message, Claim Jump [End of Game])
Parker: 3 (Plant Explosives, Power Ritual)Thoughts:
Great game, tough game, everything felt like it was hanging on the edge the entire time. It has taken a while for me to really get a hang of the Savage crew, but they have been a great crew to play, requiring you to balance the resources of Ice Pillars, cards, suits, and wounds. If people haven’t taken a look at them, I strongly encourage that they do so!
Feedback wise; basically everything was solid. Parker is legit and scary to play against, he seems very good at scheme running in particular.
Two items on Savages: I am not overly fond of Euripides’s defensive trigger, and do advocate that he get Frozen Vigor in its stead (this helps to bring his use of The Old Ways more in line with the rest of the crew). The other part is that the Shattering Shove trigger on the Gigant has no limitations on range. It is an incredibly useful trigger for moving Savage models up the table, but as a general rule I am always concerned about abilities with unlimited range. Given that Ice Pillars are Ht 4, perhaps a LoS stipulation may be a consideration.
Game length was our typical 3 turns in 2 hours, which has been fairly steady for the entirety of closed and open Beta.
-
Cyclops are quite good.
They are min damage 3, with 2" engagement.
They are the only models other that Euripides who can create ice pillars on demand.
They can stagger models at range, in a crew that causes a significant number of Mv duels.
If you time your activation order right, on Turn 1 with Old Ways 2 Cyclops can create pillars off of one Tome card.
-
Honestly in a dozen or so games, I have only had issues once keeping her alive at Def 5, Terrifying 13, and that was a Parker gunline (and they mostly killed the crew, not her). In another case she was literally surrounded by Misaki, Yamaziko, some other stuff and she was able to scoot outta that situation. She just locked them down with help from Candy.
-
Attacks generated by a trigger cannot declare a trigger. Page 11, last paragraph.
-
Antipathy: After an enemy model ends a
movement within a4 of this model, after
resolving the current Action, the enemy
model must pass a TN 13 Wp duel or be
Pushed 3" away from this model. This Push is ignored by the Antipathy Ability of other friendly models. -
They do need staggered on them first, apologies. Fixed, cleaned up, and list of models that apply Staggered at range added.
-
Dreamer can only summon Minions.
-
I didn’t start testing Euripides until towards the end of the closed Beta, so my experience with him is somewhat limited. Nevertheless, I thought I would share what I had learned thus far, and hope it is a helpful launching point for other’s brainstorms, games, and ideas. One note is this is written off of the 12/19 update, so apologies for any factual errors due to changes that have occurred since. I wanted to post this up as quickly as the open beta went live, so I will most likely have to do another pass through to fix changes/errors. The goal isn’t to go into great detail on every ability on the models, just to hit the highlights, as I find that getting a 150 page pdf to just read through can be a bit overwhelming at first.
Why play Savages? Playstyle wise they offer a lot of dominating board control with the ice pillars and rough terrain. They are a very interesting crew to use as you have to manage several resources in wounds for The Old Ways, your discard pile, and the ice pillars themselves. Also they are giants and that is just badass.
Being a relatively recent addition to the game, the Savage keyword is somewhat limited:
Euripides
Primordial Magic
Thoon
Geryon
Cyclops
Gigant
Bultingun
LyssaThe Old Ways: It can be a little crazy to get your head around at first, but it is a phenomenally cool ability. It is particularly useful to cycling suited cards to get multiple triggers in a row, but also just for reusing high cards in your deck.
Ice Pillars: A key feature of the crew, one thing to keep in mind is that they generate cover against shooting attacks. Additionally, destructible terrain requires a model to be within 1” and take an action to remove it, so always bring them up a bit further that 1” from models if possible, so that you waste the most amount of AP. Additionally, there are models in each faction with the ability to remove terrain, they will most certainly be counter-hires and things you need to keep a lookout for in order to neutralize. If your opponent does not bring counter-hires, incorporeal, or flight, they will quickly find themselves at a severe positioning disadvantage.
Guild: Riotbreaker, Cornelius Basse
Resurrectionist: None
Neverborn: Poltergiest
Arcanist: Willie Brant, Union Miner, Soulstone Miner
Outcast: Mad Dog Brackett, Drache Trooper
Gremlins: Lucky Emissary, Pere Ravage, Alphonse
Ten Thunders: Obisidian Oni, Sidir AlchibalAn additional item to be aware of with the crew is movement. The ice pillars are fantastic for blocking choke points, but it is a two way street, they also block off you. And just as they give cover, they also provide your opponent’s models with cover. On top of this, the majority of the theme models are on 50mm bases, which does present difficulty maneuvering across the table. It is particularly important to plan your first turn moves before you deploy otherwise you can jam yourself up. Fortunately the crew itself has numerous abilities that let them manipulate the position of ice pillars and teleport around the table.
Frozen Vigor: This is an ability found on a majority of the theme models. It is relatively easy to get use out of, and essentially allows for 2 free uses of The Old Ways a turn. Once during your activation (then you heal one wound) and then a second time after your activation defensively (shielded removes the damage from The Old Ways).
Euripides: The big guy himself is pretty chunky with 14 wounds, however with The Old Ways he has a tendency to burn through them quickly. Intuition is a straightforward ability that synergizes well with The Old Ways and makes your activation very efficient with a little forward thinking. Rune Shaped Ice/Frozen Domain are his go to action/trigger, particularly for set up in the early game, it allows you to get out multiple pillars efficiently. Reflected Visage/Shattering Surprise is the best way of moving around the table, and solves a lot of his large base issues. Glacial Shove is great for bottling up enemies and setting Cyclops up later on in the turn.
Also don’t forget Entomb in Ice! This ability helps a ton with pillar generation and also stops some crews cold (pun intended).
Primordial Magic: A support totem, keep him safe in the back to get that extra card each turn! He has two roles depending on your needs and when you activate him: make a model incorporeal (early turn) and remove enemy scheme markers (late turn). Incorporeal is particularly useful with this crew, as the large bases can be difficult to maneuver across the table and there is little in the way of damage reduction.
Now for the crew! They broadly fall into general categories to cover various roles (again, new keyword). The henchmen is a bit of a generalist, Geryon is a melee beater, Gigant is ranged, and Cyclops is support. Bultingun are excellent schemers, and Lyssa are a VERY solid model for only 4ss.
Thoon: Shifting Ice is another useful trick to help your own models navigate the table. Most everything he does is relatively middle of the road, with one stand out: Frozen Trophy. For the most part the crew doesn’t have much that ignores defensive abilities (i.e. armor), so instead when you have a difficult to remove problem, you toss it into an ice pillar. The pillar can then be moved back and away from enemy models so that they cannot free their comrade.
Geryon: He’s a melee beater! Pretty straightforward guy, and he can also remove pillars to heal himself. The 2” reach is fantastic in M3E, as is the min 3 damage. Chill is a very strong trigger, as it removes an AP from a model as you are damaging it. Shoulder Rush is a way of manipulating ice pillars for benefit, but definitely can feel overly complicated. Inhuman Reflexes is an upgrade well worth considering as Diving Charge can provide a bit of extra damage, but also allow you to charge through an ice pillar you are hiding behind.
Cyclops: An iconic model, and a huge part of the crew. Other than Euripides they are the only other model that can drop an ice pillar on demand. Additionally, they have a strong min 3 damage track (min 3 is a BIG deal in M3E). Their biggest impact however may come from Frozen Runes. This ability lets them heal models in a pulse, but even more interestingly they can stagger off an ice pillar. This synergies significantly with a lot of abilities in the crew. It makes it easier for Euripides to go bowling with ice pillars for example. It is feeds into the positioning control theme of the crew.
Gigant: Cheaper end, ranged savage giant. The arcing shot is important when playing around ice pillars, as it allows them to ignore the cover that their own crew is generating. They can also teleport around the table with Shattering Surprise, but more interestingly perhaps is that they can teleport other models Shattering Shove. There are currently no restrictions on friendly models or which ice pillar they can be placed next to.
Bultingun: Were-hyena scheme runners! Just by being on the table they place severe terrain, which adds even more movement control to the crew (see a pattern?). Toss in the Mud is a bit pricey needing a 7, but removing a condition and pushing a model 2” can be quite handy. Deadly Pursuit though is a key ability that should not be overlooked on them. The End Phase timing has Resolve Effects occur before Score VP, therefore they can push a free 4” before checking to score. This can allow for surprise moves for schemes such as Hold Up or Outflank. Otherwise, they are just super duper fast too.
Lyssa: The Lyssa are they cheap, filler models for the crew. While they don’t appear to be much at first glance, Incorporeal gives them incredible mobility (even through ice pillars) and they are more durable than they cost thanks to combining Incorporeal with Frozen Vigor. A lot of their attacks have a low Stat, making them more reliant on The Old Ways if you want a solid shot at getting something off. Misdirected Rage can be a bit tricky to set up, but any ability that nets you a free action is a very efficient ability to use (you are doubling your AP). Glimpse of Insanity is also useful as some of the abilities that remove terrain (Mad Dog) are bonus actions.
Non-Savage Models
Mysterious Emissary: His attacks synergize strongly with the Stagger from the Cyclops making it even easier for him to hit. Then your opponents must work through severe, hazardous terrain AND ice pillars to make any forward progress (and take damage in the meantime).
Iggy: He competes a bit with the Primordial Magic to remove scheme markers, but Iggy should be in consideration (even with tax) for every crew. He gets 3 AP with Reckless, and Arson in the right scheme pool means that he can nearly single handedly shut down an opponent.
Angel Eyes: Sniper, ignores cover. You play a crew that controls positioning, but needs ranged attacks that ignore cover. She does this.
Lucius: A fun pick for a second master. He has a sniper rifle as well, so ranged attacks that avoid cover, yay (also Injured!!!). He can also Issue Command to minions, which is everyone except Euripides and Thoon. Given that the Savage models have a lot of min 3 damage tracks, this can be quite the force multiplier.
Serena Bowman: She is difficult to drop with Eternal (benefits from a larger hand size) and brings a lot of healing to a crew that spends its wounds for defense. She is another model that should make it into a wide variety of Neverborn crews. She can also offensively place enemy models into perfect position for a nice Frozen Trophy.
Upgrades
Upgrades are actually very useful on Savage models compared to other crews, as they actually have Minions with a high cost and wound stat. This makes the cost of an upgrade more palatable and allows you to access all 3 abilities.
Inhuman Reflexes: Butterfly Jump is VERY strong in this crew, as you can jump out of combat or into cover against ranged. Also allows you to charge through ice pillars, which is super handy.
Ancient Pact: Card draw is always good, and with 2 copies of this you get a +4 to initiative flips. I honestly tried testing the +4 but the heart of the cards always made my flips bad ever since, so I am not sure how balanced or powerful it really is.
Eldritch Magic: A difficult upgrade to find specific purpose for, I think it will mostly be a counterpick against specific masters/crews once the meta settles and we get more experience.
Gameplay
Euripides is the MC Hammer of Malifaux--you can’t touch this!! Drop some rough terrain, some ice pillars and your opponent is going to have a devil of a time getting to you or accomplishing their schemes. And then by the time they get to you, they learn just how hard giants hit in melee. Additionally, all those ice pillars can be used as cover for your own models too, just keep in mind all the ways to teleport, diving charge, or throw them out of your way!
-
 4
4
-
-
I got started with Lucius in the beta, because no one was playing him! I thought I would share what I had learned thus far, and hope it is a helpful launching point for other’s brainstorms, games, and ideas. One note is this is written off of the 12/19 update, so apologies for any factual errors due to changes that have occurred since. I wanted to post this up as quickly as the open beta went live, so I will most likely have to do another pass through to fix changes/errors. The goal isn’t to go into great detail on every ability on the models, just to hit the highlights, as I find that getting a 150 page pdf to just read through can be a bit overwhelming at first.
Why play Elite? The card draw is fantastic, they have an enormous amount of flexibility, and there is nothing else in Neverborn than can come close to their ability to lay and manipulate scheme markers.
The Elite keyworded models are:
Lucius Mattheson
The Scribe
Agent 46*
Alan Reid*
Investigator*
Guild Lawyer*
False Witness*
Doppleganger
ChangelingThe models with a * are all Guild models. I think one of the unfortunate limitations of the dual faction masters within the keyword system (Lucius, Marcus) is that it does increase the barrier of entry to them because there isn’t really much overlap with other masters within the faction (in this case Neverborn). Nevertheless, I strongly encourage checking them out and playing the faction as a whole.
One of the main defensive abilities of the crew worth highlighting is the ability to put your opponent on negative flips when attacking. Lucius has Serene Countenance, other models have Intimidating Authority or Manipulative, there is also Fade Away and Stealth. As there is no really unified defensive ability, you have to plan activation order around how you want to leverage these. For example, you want Manipulative models to go as late in the turn as possible.
Following Orders: One of a couple of card draw abilities available to the keyword. It is pretty straightforward, but strong, the once per activation limitation is there to prevent chain drawing cards. Card draw is a common element within this keyword, as Lucius himself allows you to draw a card anytime anyone spends a pass token, Investigators can draw cards off of markers, Nefarious Pact, and so on.
Intimidating Authority: Sprinkled across a few of the models, this ability ties well with the increased hand size and card draw of the crew, allowing you to put enemy models on negative flips at will. Models with this are:
- Alan Reid
- Investigator
- Lawyer
Lucius: This is a guy whole rolls with OPTIONS. All day, every day. If he walks, everyone else moves. He brings his own sniper, and can draw range and LOS off of ANY Elite model. The is perfect for picking on flanking scheme runners, and Injured is a very strong debuff. Interestingly, he can draw the range and LOS of engaged Elite models, but due to the projectile icon cannot use the ability if he is engaged himself.
His number one, most popular action is Issue Command. Typically I try to spam this as much as possible, and if you do so on an Elite model, then you draw a card to boot. The push requires a bit of set up, but it is always good to have a threat exender. What this ability also does is dictate crew hiring. A large amount of the high value Neverborn beater models are not Minions, and cannot be commanded. This pushes him a bit off the beaten path of Hooded Rider or Hinamatsu, and more toward Savages or Mature Nephilim.
Misinformation is also particularly strong (and had to be toned down). You get to see your opponent’s hand. You get to throw away two of their face cards. Profit.
One thing of note is that Lucius can often make his way up to the middle field. Serene Countenance makes him a bit of a pain to take down, and he wants to be able to leverage Entourage and Subterfuge from that position, not to mention Misinformation is only Range 6. This makes him susceptible to Deliver a Message.
Lucius can be pretty interesting as a second pick for Savages or Chimera. Both crews have a lot of high value minions that he can command and both benefit from +1 hand size. The crews can be built as small and elite, allowing you to better leverage pass tokens for card cycling as well.
The Scribe: A pretty odd totem. The Scribe is best used aggressively, either as a Hidden Sniper beacon, Betrayal bomb, or to physically block off enemy models. The moment they attack him, discard, bury, and then pop up next turn where you can effect the most friendly models with Unseen Butler. All his abilities are pretty nice, pulling friendly models back or ending conditions are always handy.
Agent 46: Agent 46 is amazing and always getting the job done. You have to put the model on the table to really appreciate how efficient Inhuman Physiology makes this model. Analyze Weakness is a very helpful buff, particularly in Neverborn, which doesn’t have a lot of abilities to ignore armor. Great in melee, but Mimic really opens up some options. Consider you can Mimic the sniper rifle off of Angel Eyes, then when you shoot an enemy, they cannot cheat fate. On top of that, the rifle shot can be done with Issue Command both from Lucius and the Changelings.
Alan Reid: Alan Reid is probably the hardest model in the crew to get work out of, and takes a lot of set up. Everything he does comes down to “One More Question”. Obviously ranged Slow on a stick is quite strong. But it is really the engaged clause and Coordinated Attack trigger that make him dirty. It requires comboing together him, a False Witness, and an Insidious Madness. At that point the Witness uses Distraction to give the enemy negative flips on Wp duels, then he does One More Question while the Madness engages. Your opponent is at a negative and cannot cheat, and with the Coordinated Attack trigger you are putting down 1/3/4 followed by a 2/3/4 attack, also at a negative flip. If you get the right suits or use soulstones, that is a minimum of 3 damage, but usually with the negative flips you can get much higher. It takes a LOT, but can be VERY effective. Also if they go to attack the Insidious back and are in the Distraction bubble, then they are a negative flip against the Terrifying check. If you are not comfortable with the Madness, you can do the same with a Mature Nephilim or Hooded Rider, where they use Ride With Me to deposit the False Witness in the optimum position, also their minimum damage is higher.
Investigator: These guys are all sorts of useful! They have card draw, then can push models with placed markers (see False Claim). The stop enemies from scoring scheme markers. A hidden trick with them is they actually have a pretty solid damage profile with the Garrote. The Stagger trigger is built in, but needs to damage to apply Stagger. Then, if the target is Staggered they are actually min damage 3 for 7 ss. This makes models that put Stagger out at range more noteworthy (also because Stagger is better when you are not already in melee):
- Mysterious Emissary - Spread it Around
- Tuco - Custom Shotgun
- Vasilisa - Tangled Threads
- Thoon - Hooked Chain
- Cyclops - Frozen Runes
- Sorrow - Startle
This list isn’t necessarily to recommend these models with an Elite crew specifically, more to highlight non-melee Stagger options.
Guild Lawyer: Obey on a Minion! It requires a 9 Masks to go off, but you can use Tools for the Job to get the needed suit and cycle cards a little. Their other dirty trick is Impassioned Defense to put Shielded +2 on two different models. This couples really well with Incorporeal models or anything with damage reduction, as at that point you can effectively ignore attacks that do 2 damage or less (until Shielded runs out). Hinamatsu with Armor +2 and Shielded +2 is pretty legit (downside: not a Minion).
False Witness: They are your scheme runners. False Claim is incredibly useful for scoring, as well as all the scheme marker interactions they have with the Investigators. Being able to drop markers at a distance and even while engaged is very strong. It can be very helpful to drop a bunch of scheme markers on Turn 1 in your deployment zone, then remove those with False Claim later on in the game. Paired with an Investigator, these early game scheme markers can serve double/triple duty, pushing your models up the table quicker and adding to card draw. Another big draw for False Witnesses is the Distraction aura, which is devastating when leveraging Wp duels, which the crew does a lot of, or Terrifying duels.
Doppleganger: Lure is always strong, but she brings a Stat 7 Mimic. Get creative!
Changeling: These are Lucius’s unofficial totems. They are cheap and can copy Issue Command off of him using Just Like You. In addition to all the other Elite/Minion models to command, you can also Command Lucius himself as he is Elite in order to make him walk (and trigger Escort) or take another shot with Hidden Sniper.
Non-Elite Models
Angel Eyes: Sniper to Mimic with Doppleganger or Agent 46. Straightforward.
Mature Nephilim: It is a very fast, very aggressive minion (and can therefore be commanded). Ride with Me is a great ability for placing Lucius up front even faster, or for precisely dropping off a False Witness. The Heavy Claws just have a great damage track too for Issue Command or Mimic.
Cyclops: Pretty out there, but hear me out. They are relatively cheap (7+1) for a model with 2” reach and min damage 3. Their health is above average for their cost, and they have Frozen Vigor for even more durability. They can also drop out ice pillars, and are Minions, so can be commanded. The ice pillars are useful for holding enemies back if you are running a gunline with Agent 46/Angel Eyes (who also ignore cover from the sniper rifle). Additionally, the Cyclops can pulse out an irresistible Staggered onto enemy models, which synergizes with the Garrote from Alan Reid and Investigators (granted this was more useful when Staggered was a stacking condition, not a binary one).
Insidious Madness: Incorporeal, Terrifying, attacks Wp in a crew with access to False Witnesses. They are also easy to deliver if summoned by the Dreamer due to the From Nightmares ability on the Waking Dream upgrade.
Dreamer: At cost 13 (12+1) he is cheaper to hire than 2 Insidious Madnesses (7+1 = 8, 16ss), so you save 3 ss. Also the summoning upgrade lets you place them near models that fail Wp duels, which are common in this crew in certain builds.
Serena Bowman: She is difficult to drop with Eternal (and benefits from the extra hand size and card draw) and brings a lot of healing to a crew that really doesn’t have much healing. She is another model that should make it into a wide variety of Neverborn crews. Also if you are running the Dreamer, she is a Nightmare and can make another minion a Nightmare to even better synergize with the second master.
Iggy: He is your anti-schemer and should be in consideration (even with tax) for every crew. He gets 3 AP with Reckless, and Arson in the right scheme pool means that he can nearly single handedly shut down an opponent. Additionally, he is a 6 ss model with a min damage of 3 (2 + burning). Since every attack gives burning, all of his attacks on a target can be at a positive flip (the first attack does need another model to set up a condition, afterwards he applies burning, then removes it with Opportunist, only to reapply it again).
Upgrades
Upgrades aren’t amazingly needed on Elite models, I would say take them as you want them on a model by model basis, but the crew works just fine if you want to just reinvest the stones into more models or a bigger cache.
Inhuman Reflexes: Butterfly Jump is VERY strong in general, as you can jump out of combat or into cover against ranged. Lucius also tends to want melee Minion beatsticks in order to Issue Command to them, so you get the maximum benefit from the upgrade. The bigger limiting factor though is that these are often out of keyword, forcing you to pay for both the upgrade and the tax. I did try it with a pair of Mature Nephilims and it was acceptable, but doing so was VERY expensive.
Ancient Pact: Card draw is always good, and with 2 copies of this you get a +4 to initiative flips. I honestly tried testing the +4 but the heart of the cards always made my flips bad ever since, so I am not sure how balanced or powerful it really is.
Eldritch Magic: A difficult upgrade to find specific purpose for, I think it will mostly be a counterpick against specific masters/crews once the meta settles and we get more experience.
Gameplay
Lucius can be built in a wide variety of ways. You can do a more aggressive focused crew with Agent 46, Doppleganger, and models for them to mimic such as Mature Nephilim or Angel Eyes. You can do a scheme oriented crew with Witnesses and Investigators, or you can do the One More Question trick with Dreamer, Reid, and Witnesses. This is a crew that really rewards model exploration, and being willing to take the risk to go out of theme and start hiring in a model or two at +1 ss tax.
-
1
-
 1
1
-
I was able to spend a good chunk of the open beta playtesting Pandora, even playing her in a local beta tournament and eeking out a 1st place win. I thought I would share what I had learned thus far, and hope it is a helpful launching point for other’s brainstorms, games, and ideas. One note is this is written off of the 12/19 update, so apologies for any factual errors due to changes that have occurred since. I wanted to post this up as quickly as the open beta went live, so I will most likely have to do another pass through to fix changes/errors. The goal isn’t to go into great detail on every ability on the models, just to hit the highlights, as I find that getting a 150 page pdf to just read through can be a bit overwhelming at first.
Why play Woe? Because they are well rounded and can basically handle anything with some practice, experience, and thoughtful crew selection.
The keyworded models are Woe:
Pandora
Poltergeist
The Carver
Candy
Baby Kade
Iggy
Aversion
Sorrow
LyssaThe Woe models themselves don’t interact much off of the keyword (mostly just Pandora). This means that crew hiring is a bit freer than in other keywords, and you are able to toss in some independent models who are just good on their own like Hooded Rider or Hinamatsu.
Misery: Let’s get this out of the way early. It is much changed, and much weaker than in M2E. It is also on a lot more models, and the more it is on, the more likely it will happen. You will get lots of free damage out of this ability, but it is significantly more limited. Also Auras don’t stack, so you cannot get multiple Misery’s on one target.
Opportunist: This ability more than makes up for Misery. Your opponent will basically never have consistent access to Focus, Fast, Shielded, etc. You just eat their feelings. You can also eat the debuff conditions as well if the benefit outweighs the cost (i.e. concealment, manipulative, etc.).
Pandora: It’s best if you just take everything you know about M2E Pandora and chuck it out the window. You’ll see a lot of similar themes, but a brand new game makes for a brand new box of horrors to open. Pandora is a pretty hard to take down Master, with Terrifying 13 and a very punishing defensive trigger. This is a good thing, as she usually plays forward in order to leverage Mood Swings, Grasping Tentacles, and The Box Opens. Unfortunately, this makes her vulnerable to schemes such as Deliver a Message.
Mood Swings is best used sparingly and tactically, usually you only need to disrupt a model once a turn, such as preventing their heavy hitter from getting to yours first. She has two attack actions (single target and multi-target). Her attack’s effect is dependent on your opponent’s model, however having the ability to Slow a model while damaging it is fantastic, particularly if it is a high value model. The shockwave is limited to once a turn because in beta testing it was being used to spam 20-40 duels in a row over two activations of Pandora (went last in one turn, first in the following turn).
Despair’s Influence is very strong. It is most effective on models that can cycle through a large amount of actions such as Baby Kade, but it can also be used on defensive triggers for Pandora, Iggy, and Candy for example. An interesting use of it is to spam the Execution trigger with Kade and Carver. If Candy gives Carver fast then they can put out 7 Executions a turn.
Grasping Tentacles typically has limited use, but I have found is most effective when paired with severe terrain, either using a trigger to push models into it or with the Mysterious Emissary. Most models are Mv 5 or 6, you are then dropping them to Mv 1.5 or 2, and dramatically reducing their efficiency.
Given Pandora’s relatively independent nature, durability, and that she is a crazy control master, she makes for an easy second pick in pretty much any other crew, provided you don’t find better synergies for the cost.
Poltergeist: Distraction is a very powerful ability in a crew that leverages Wp duels as much as Pandora does. However it can only be in one place at a time, so use it wisely! Additionally, the Poltergeist is fast and incorporeal, so can make an excellent scheme runner or bomb holder. Telekinesis is the only way in Neverborn to efficiently remove destructible terrain, so look to grab Pandora and this guy in match ups against Rasputina, Euripides, and Zipp.
The Carver: The Woe beatstick. He is fairly reasonable, but it does feel that he requires a lot of investment from Pandora in order to get the most out of him. Stat 7 is really nice though, and it is occasionally helpful to have a gun built into the beater model too. Unfortunately due to Kade being in keyword, he faces some competition from Teddy.
Candy: Candy may upset your opponent more than any other model, all due to Corrupted Influence. This dictates a lot of her positioning and order activation, typically she is going to go last and head for the biggest gaggle of models she can find. I have found that gunlines have a much better time dealing with her than melee armies, as they can focus and pick on her at range. It is very useful to bring the Hooded Rider to use Ride With Me to move her up into position as well. Once she does activate, she is going to pop Temper Tantrum a bunch and give models Slow and Stunned, basically dropping them down to just 1 AP. Don’t underestimate the power of Self Loathing on beater models either.
Baby Kade: An efficient killer who requires some work to set up. 1 AP Lure, move them into range to trigger Rip and Tear and Pounce. Then you will get to put 4 attacks into that model, at Stat 7 no less. After those 5 actions, he also can move Teddy around (and he makes Teddy versatile). Great target for Despair’s Influence due to how many attacks he can make at high stat (like Rams for Critical Strike and Rip and Tear on every attack).
Iggy: He is your anti-schemer and should be in consideration (even with tax) for every crew. He gets 3 AP with Reckless, and Arson in the right scheme pool means that he can nearly single handedly shut down an opponent. Additionally, he is a 6 ss model with a min damage of 3 (2 + burning). Since every attack gives burning, all of his attacks on a target can be at a positive flip (the first attack does need another model to set up a condition, afterwards he applies burning, then removes it with Opportunist, only to reapply it again).
Aversion: While a bit expensive for a scheme runner, they are incorporeal and very survivable. They are really good for things like Claim Jump, where they can activate last and irresistably push models away with Scatter.
Sorrow: Cheaper, incorporeal scheme runner. Key ability is Misery Loves Company, with proper set up Sorrows can move across the table with disturbing speed.
Lyssa: The cheapest filler models for the crew. While they don’t appear to be much at first glance, Incorporeal gives them incredible mobility, but in a crew that doesn’t run Cyclops they miss out on Frozen Vigor, which hurts due to wanting The Old Ways too. A lot of their attacks have a low Stat, making them more reliant on The Old Ways if you want a solid shot at getting something off. Misdirected Rage can be a bit tricky to set up, but any ability that nets you a free action is a very efficient ability to use (you are doubling your AP).
Non-Woe Models:
Teddy: He is an honorable Woe due to his partnership with Baby Kade. Good, solid beat stick, more durable than The Carver. Kade can move him around on the table, Pandora moves The Carver around the table, so there is a bit of pick your poison here. Typically I have preferred Teddy over The Carver.
Hooded Rider: Practically a staple model with this crew, and really a standout for the faction as a whole. He is fast, durable, hits hard, and with Ride With Me can place Pandora or Candy where you need them very early in the game. He becomes even more durable once the control elements of the crew come into play, and having a 2” reach model is not to be underestimated. I had a game versus Ironsides where she did next to nothing because Candy auto Stunned her, Pandora slowed her every turn, and The Rider always made sure to have her in melee range but not be in her range so she cannot declare a charge.
Serena Bowman: She is difficult to drop with Eternal and brings a lot of healing to a crew that really doesn’t have much healing (Candy is usually busy with more important things than being helpful). She is another model that should make it into a wide variety of Neverborn crews.
Upgrades
Upgrades aren’t amazingly needed on Woe models, I would say take them as you want them on a model by model basis, but the crew works just fine if you want to just reinvest the stones into more models or a bigger cache.
Inhuman Reflexes: Butterfly Jump is VERY strong in general, as you can jump out of combat or into cover against ranged. Unfortunately Woe doesn’t have very many high cost beater Minion models, limiting your ability to leverage all 3 parts of this upgrade.
Ancient Pact: Card draw is always good, and with 2 copies of this you get a +4 to initiative flips. I honestly tried testing the +4 but the heart of the cards always made my flips bad ever since, so I am not sure how balanced or powerful it really is.
Eldritch Magic: A difficult upgrade to find specific purpose for, I think it will mostly be a counterpick against specific masters/crews once the meta settles and we get more experience.
Gameplay
I have found the most successful way to leverage her has been to use Pandora and two beefy models (typically Teddy and Hooded), along with Candy, to engage and lock down as much of your opponent’s forces as possible while the rest of your models run schemes. She has shown some weaknesses to gunlines as well, and Neverborn as a faction seems to struggle a bit with that archetype.
-
6
-
-
@Mason Thanks for all of your time, patience, and hard work. We really appreciated you and you will be missed! Best wishes!!!
-
1
-
-
8 hours ago, Sc4rpelli said:
I'm struggling with candy too. Nice to know I'm not alone in that!
Never alone!
I will say what a difference a game makes. In my first game I was floundering a bit, in my second I found the niche for her to function in (until she got buried). My knee jerk was to actually leave her at home until I started fiddling with her a bit, she definitely seems to take practice. It feels like she is a piece that wants to go last-ish, toss her trigger on something big that has already activated, then get within 3". My learning moments were of course actually figuring that out (go figure!) and then the painful realization that the trigger is on a projectile attack, so engagement is a thing. I feel like if I am playing Voices Pandora I would want to keep her in, whereas if I am playing Box or Woe Pandora I was looking much harder at Aeslin who does similar things, but has more reliable damage and is more durable? Maybe? It sounds like @Rionnay knows better than I, but I may experiment with it anyways just for fun!
@Rionnay Not past tense, we still pig it up.
I do have the Hooded Rider done up, I was just trying to be cute with Bishop and target willpower and the the trigger to push models into Pandora's swirl in the middle.
-
Got in another game, trying to get these written and posted up before M3E wipes out everything. One thing I did want to make sure I did was explore a little bit all of a master, so not just Summon Pandora, but Voices and Boxes Pandora as well.
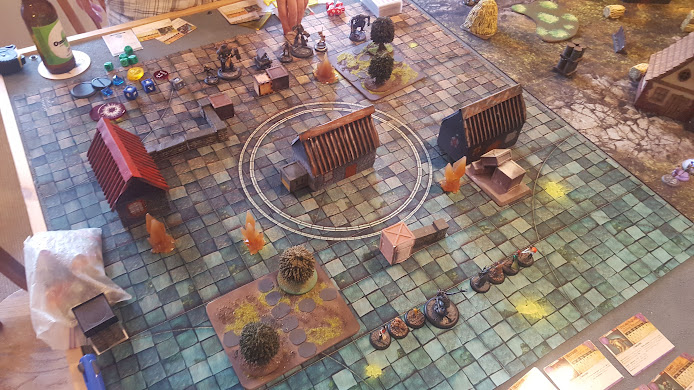
Pandora (Neverborn)
-Voices
-Rile Them Up
-Depression
Poltergeist
Candy
Baby Kade
Beckoner
Beckoner
Stitched Together
The Tooth
The core concept behind her upgrades is pretty simple: discard a card for Crows with Depression, use Rile Them Up for Incite as a (1) Action, then two Paralyzes as needed.
Von Schill (Outcasts)
-Nythera Aftermath
-Oath of the Freikorps
Steam Trunk
Hannah
Lazarus
-Scramble
Pride
Talos
Freikorps Engineer
Strategy: Ours
Schemes:
- Guarded Treasure (Von Schill)
- Set Up (Pandora on Talos)
- Undercover Entourage (Pandora, Von Schill)
- Recover Evidence
- Search the Ruins
Pandora wins the flip, Von Schill deploys first.
As always I’ll do my best to remember the order things happened, but it is from memory so please bear with me.
Turn 1: Mostly indeterminate moving forward. The Engineer gets a scheme marker and puts extra armor and hard to hit on Talos. Hannah is able to copy it and do the same to herself. Von Schill attaches 3 Oathkeepers. Stitched together puts up creeping fog. Pandora activates towards the end, double walks up and Incites the Steam Trunk.
Turn 2: Steamtrunk gets Incite’d to go first. Stitched puts up Creeping Fog. Engineer gives a Rams to Lazarus, moves up. Pandora Incites the Steam Trunk, burns a stone for a positive flip, Paralyzes Lazarus with Self Harm, Incites the Engineer as a (1) Action, scoots back behind the house. Pride walks up, tries to serenade Pandora, misses. Beckoner Lures Lazarus out of the woods to make hitting him with Self Harm a bit easier. Talos walks up, drops scheme marker. Candy advances, hits Talos with Wail and gets the Mood Swing trigger. Hannah copies the serenade from Pride, advances and pops the Stitched with it. Poltergeist walks to engage Hannah. Von Schill burns an Oathkeeper, walks twices, charges and kills the Stitched. Beckoner fails to Lure Talos up. Tooth double walks over. Baby Kade hides. I score Ours, he scores Guarded Treasure. 1-1
Turn 3: Pandora wins Initiative. Poltergeist walks to engage both Hannah and Von Schill. I force Talos to go first, he is paralyzed by Sweets. Pandora activates, Incites Von Schill and Hannah for (1) with trigger, gets Crows with Depression, Paralyzes both of them. Incite’d Steam Trunk is next, it moves up. Beckoner successfully Lures up Talos. Incited Hannah goes next, Paralyzed. The Tooth charges Talos, drops 2 scheme markers with her triggers. Incited Von Schill goes next, Paralyzed. Baby Kade pokes Talos twice for a couple damage, Talos is down to 6 HP. Incite’d Engineer goes next, advances, drops a scheme marker, buffs Talos’s armor. Beckoner tries to pick on Hannah, fails. Lazarus charges Poltergeist, only 1 damage gets through. Pride sings 2 damage onto Pandora. Candy tries to escape the Talos, but fails the disengaging strike. I score 2 for Set-Up, he scores 1 for Ours. 3-2
Turn 4: I flip a 1 for initiative, he flips a 2. I soul stone to reflip, get a 3. How’s that for efficiency? Pandora immediately goes first, locks down Von Schill and Hannah. Incite’d Steam Trunk goes next, does Steam Trunky things. Baby Kade drops Talos down to 1 HP. Talos gobbles up Candy, heals all the way back (bastard). Poltergeist swings on Lazarus, gives him slow. Pride sings at someone, but misses I think. Beckoner starts in on Von Schill with Despicable Promises. Lazarus swings on Poltergeist to no avail. Beckoner #2 brings Von Schill down to 2 HP. Engineer charges The Tooth. The Tooth swings back for some damage, drops a scheme marker with the trigger. He scores Ours, 3-3.
Turn 5: Big initiative flip...he gets a 12 and goes first! Von Schill makes a break for it to finally get out of dodge, he burns Oathkeeper, charges and kills a Beckoner, and double walks to my deployment zone. Pandora goes, locks down Hannah, kills Lazarus with a Red Joker flip on Self Loathing. Incite’d Steam Trunk spins its treads. Baby Kade jabs Talos. Pride walks around and drops a scheme marker. Poltergeist moves to engage Talos and the Engineer. Distraction creates a fun interaction where he cannot cheat to keep Candy in the tank, so she pops out. Talos then just swings a few times. Candy Self Harms the Engineer. He then activates and dies to Sours. I score Ours, he scores Entourage, 4-5.
Lessons Learned: This was a crazy game, I did come out of it feeling like I learned so much. First off, Voices Pandora seems to be quite strong right out of the box, but I can very much see her being a bad NPE. It will be interesting seeing how she functions going forward into M3E, as I would assume that her hard control playstyle will be toned down, but they appear to be focusing more on a soft control style for her?
Other learning points/mistakes:
-I did a very poor job understanding and reading the strategies, that resulted in me playing them wrong and cheating myself points (especially on Entourage)
-I did a poor job setting up to score on Set-Up, with the Beckoner placing the scheme marker. The concept was to pull the Talos into range of it, but I ended up setting it too far back so that Baby Kade could not place another marker in the correct spot.
-Conversely, the Tooth was awesome at Set-Up!
-I also played Candy poorly in several respects there, not keeping in mind what attacks have a projectile and which do not. I had burned a red joker to get Mood Swings off, I could have dropped a scheme marker then for Set-Up. Also when I Lured the Talos I pulled him into engagement range of Candy which prevented her from Mood Swinging the Talos again.
-I think a big thing is that I had a perfect set up for Turn 3, which I was pretty solidly behind the wheel….but did nothing with it. I failed to kill off any models, to really score much in the way of points. I think this may be a combination of crew and poor gameplay, I did find myself struggling to get damage to stick on a lot of his models. It wasn’t until Turn 5 when I actually killed anything.
Overall, it makes me really excited to get deeper into the game, faction, master and new edition. I am grateful for my opponent’s patience with all my newness and playing a Paralyze caster too.
I have been kind of trying to filter down which Pandora is best when, and was thinking:
- Voices - Spread strategy, elite crew
- Box - Central Strategy, mob crew (perhaps summoners)
- Summon - Central Strategy, non-mob crew
-
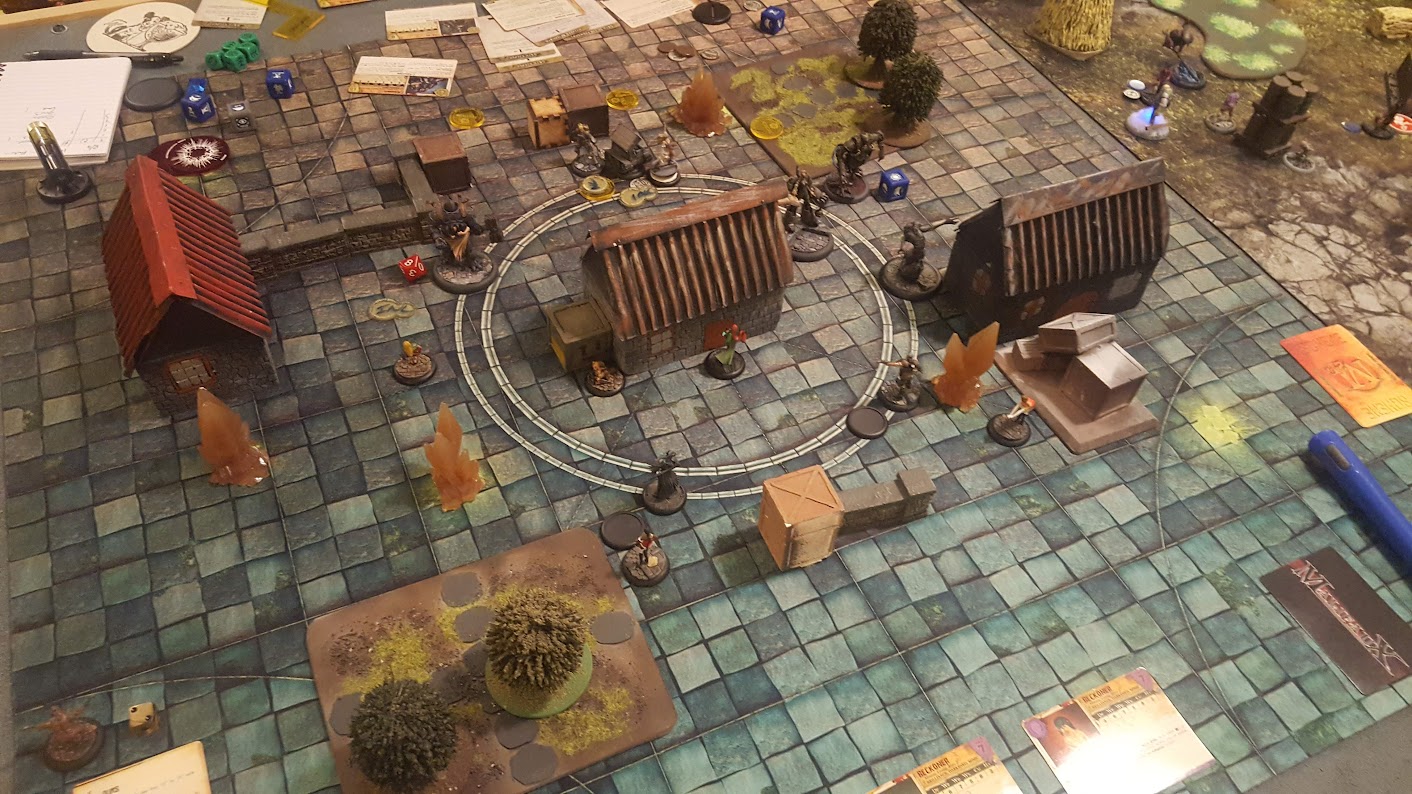
Unfortunately my ordering did not exactly go as planned, so I ended up with just the Pandora box and the grab bag of random other models that I already had to work with. Poor Poltergeist didn’t even have a base yet!
Pandora (Neverborn)
-Woe is Me
-Rile Them Up
-Aether Connection
Candy
Baby Kade
-Depression
Beckoner
Beckoner
Stitched Together
Bishop
Misaki (Ten Thunders)
-Recalled Training
-Misdirection
-Untouchable
Ototo
Yamaziko
-Smoke and Shadows
Torakage
Torakage
Fermented River Monk
Fermented River Monk
Thunder Archer
Strategy: Turf War
Schemes:
- Outflank (Misaki, Pandora)
- Assassinate (Misaki, Pandora)
- Distract
- Plant Evidence
- Vendetta
As always I’ll do my best to remember the order things happened, but it is from memory so please bear with me.
Turn 1: Stitched moves up and uses Creepy Fog. Ototo leads the charge. Beckoner goes to Lure him, learns the hard way that he cannot be lured. Yamaziko drops smoke bombs. A Torakage moves up to help Ototo. Pandora moves up, Incite on Torakage (miss), discard Incite on Torakage (miss), Self Harm Torakage, weak damage. Everything else just moves up on both sides, River Monks gain Poison.
Turn 2: Pandora puts Incite on the Torakage, summons a Sorrow on him, Incites again (miss), Self Harms the River Monk. Ototo moves up and swings on Pandora, she cheats up to make him miss and let her scoot away. Archer shoots at Baby Kade, misses. Beckoner walks over, Lures the River Monk forward and kills him with Misery. A Poltergeist is summoned. Torakage charges Beckoner, 2 damage. Baby Kade charges Ototo, takes him down to Hard to Kill. Torakage charges Beckoner, 1 damage. Stitched Kills Ototo. Misaki moves up to assassinate Bishop, after the dust settles she manages to discard my hand and do 3 damage to him. Bishop does 3 damage in return. Yamaziko moves up and swings on Bishop. Candy fails to heal Bishop. Beckoner uses Lure to put more Misery damage on the other River Monk. We both score Turf War. VP: 1-1
Turn 3: Pandora goes, applies Incite to a Torakage, summons a second Sorrow, pumps both Torakage with Inflict (they were in range of the Poltergeist aura), and takes them out. Misaki takes out Bishop (we hardly knew you). Poltergeist moves to engage the Archer and River Monk, hits the monk with Melancholy to triple down on Misery and kill him. Yamaziko goes for the poor Beckoner, still fails to kill her, puts up Brace. Baby Kade moves up to engage Yamaziko for next turn. Archer sneaks away from Poltergeist, shoots at Pandora (misses). A Beckoner Lures the Archer forward, back into range of the Poltergeist aura, Misery and Stitched kill him. VP: 2-1
Turn 4: Baby Kade activates and kills Yamaziko. Misaki kills Kade in revenge, concedes.
Lessons Learned: I think a big one right off the bat is a difference in information. I read forums like crazy whereas my opponent was less in tune, so I came to the game with a better idea of my crew synergies despite this being a first game for both of us with our respective crews.
That being said, there were so many mistakes and learning moments here. I was constantly forgetting to push Pandora with Incite so that she would be in melee, then I was looking to her projectile spell to get her into dodge so to speak, but that required shooting in combat...it was a mess every time I activated her. So I need to focus on learning my master better (go figure). I was also terrible at managing stones and cards (go figure) so need to work on that better too. Basically just gave away poor Bishop, he really didn’t deserve that.
-
1
-
With a new edition on the horizon, it seems like a good time to jump into a new (old?) faction. I knew I wanted Neverborn as I like the look and feel of the models, as well as the concepts of dangerous flora and fauna. When it came down to what master to start with, I consulted the oracle that is eBay and found a sweet $20 deal on a Pandora box set. So...looks like Pandora is first up! Kinda full circle as my first box in 2010 was S’omer Teeth Jones and my regular opponent only had the Pandora box...so many memories of farting her to death...
Moving from there, I knew I wanted to start out with two masters whose boxes complimented each other, so I selected Titania. It feels like both crews have a lot of willpower targeting overlap, but are different when comparing durability and approach. Additionally, I suspect that Pandora can benefit from the increased hardiness of Titania’s crew (armor and hard to wound).
I also benefit from having been around for a long time, so I had a random grab bag collection of models that I could already leverage in order to flesh out my master choices:
- x2 Beckoner
- x2 Stitched Together
- Hooded Rider
- Bishop
- Freikorps Trapper
- Johan
- Aionus
Seriously random, but it covers a lot of bases. One thing I did feel that I was missing out on was a 4-5 ss model to act as a scheme runner. I waffled a bit over Gupps, Insidious Madness, and Changelings, but ultimately settled on Changelings. They feel very flexible across a range of situations, and also help pre-plan purchasing the Mysterious Emissary.
One thing I do try to pre-plan is a paint scheme. In addition to trying to get models that catch the eye, I try to focus on making it easy to paint, as I am all about the adulting and having a job and family now, meaning less nerdy bachelor time. With that in mind, I zeroed in on the idea that the Neverborn are the local flora and fauna of Malifaux and wanted something reminiscent of seeing a fox at night--the shadow, the outline, and the glowing red eyes. I had an old metal Hooded Rider, so I did a test scheme on him with two different glow techniques, white paint with a red wash and then just paint layers. Needless to say the wash wins the day for being faster and way more effective.
With that in mind, I later on did these guys too:
-
3
-
3 hours ago, Hawkoon said:
I guess Taproot would be mandatory in the crew as well as a bit of "counterpounce"? And say you get the trigger off, would they be able to attack if they are already within enemy engagement when they start the push? A lot of theorycrafting here, but I really like the models, so it would be nice to actually be able to play them effectively.
Looks like it!
-
21 hours ago, Hawkoon said:
Just ordered bultungin. Any ideas on how they would fit in a Titania crew?
You could use her ram push trigger to move them into combat and get 2 or 3 swings.
-
1
-


Dreamer - Thoughts so far
in Neverborn
Posted
It was 2", then changed down to melee due to too much healing for the entire keyword.