- Popular Post


SilentSeeker
-
Posts
146 -
Joined
-
Days Won
1
Content Type
Articles
Profiles
Forums
Gallery
Events
Downloads
Posts posted by SilentSeeker
-
-
Allmost done
")

-
 4
4
-
-
And here are the buildings, primed and dry-brushed with the first layer.

-
6
-
-
So all buildings are done and ready to be painted


-
7
-
-
On 10/12/2018 at 1:15 AM, prof_bycid said:
Welcome back, @SilentSeeker ! This has been one of my favourite threads to follow over the past few years. Glad you are back at it. The board is amazing.
Thank You very much :D
Let's have a lot on the production of some windows. Further there are more detailed pictures of two of the new buildings: a tavern (the building with the balcony) and an inn.


-
6
-
-
On 12/5/2017 at 8:58 PM, Korhiol said:
Wow, that's really a pretty amazing work!
Thank You :)
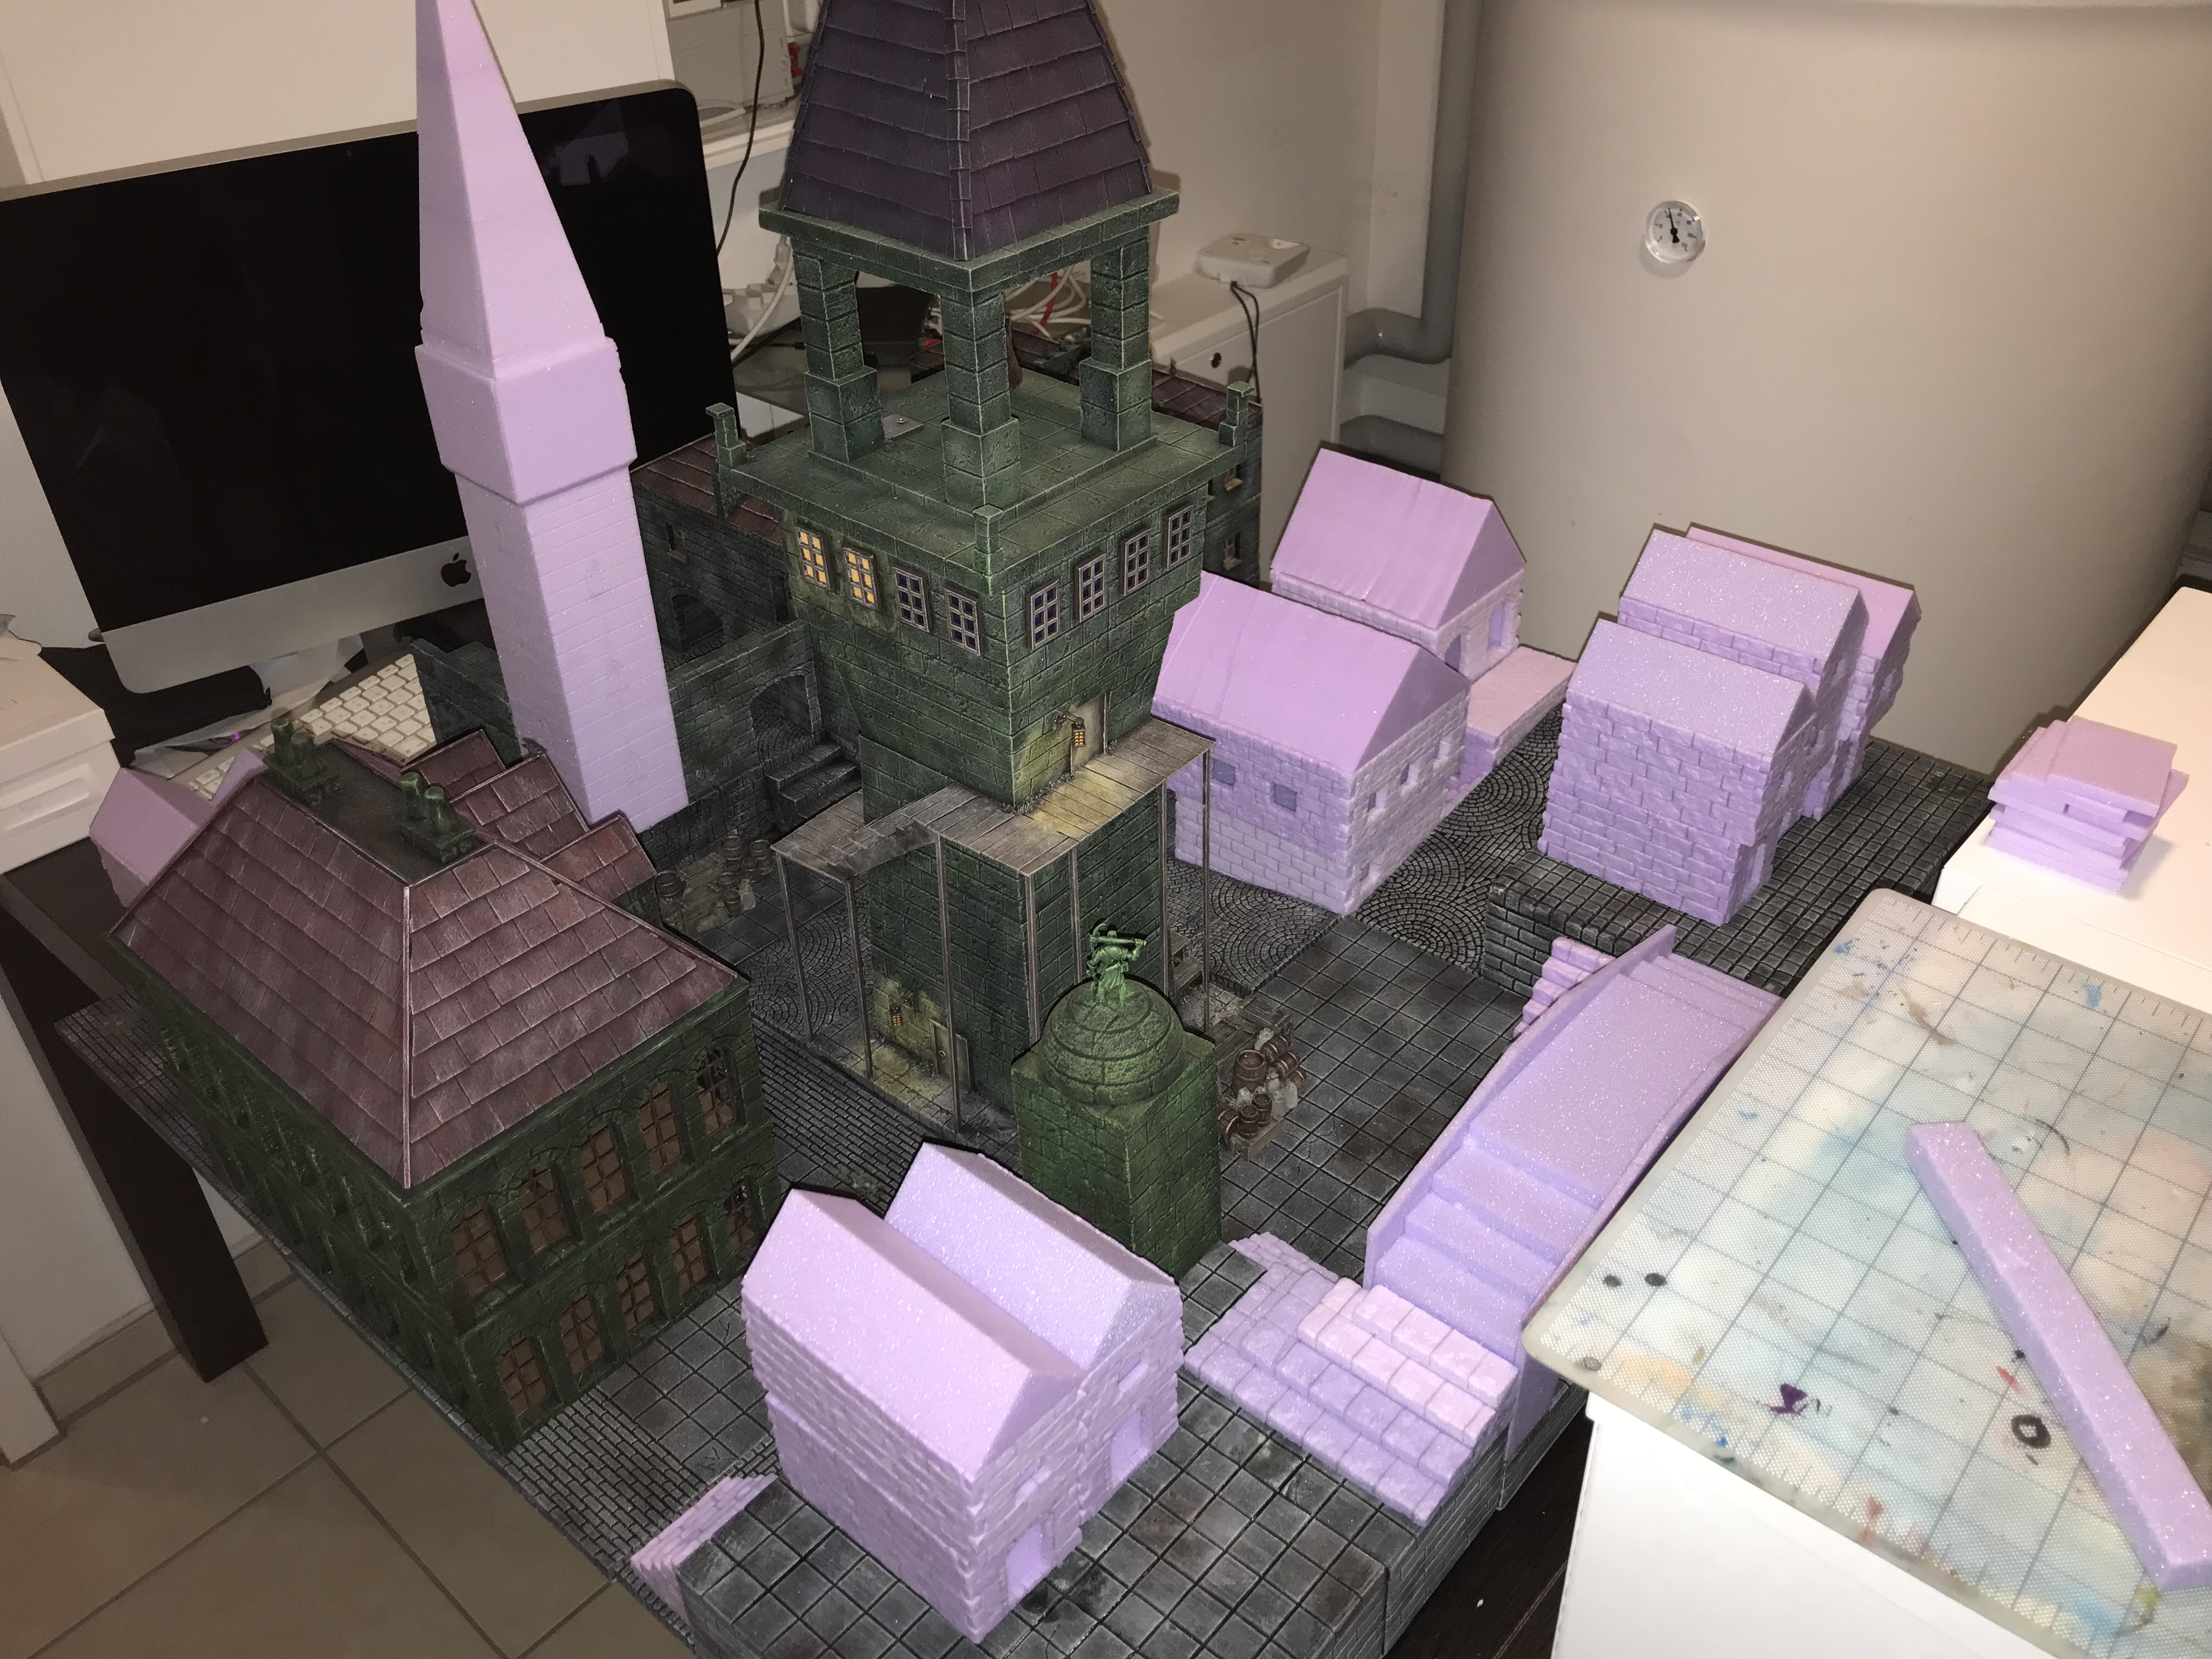
So, the break is over :) I have started making all buildings now to test the overall board layout.

-
8
-
-
Hi here
due to storage problems I'm still pausing further buildings. I'll move to a bigger place in the springtime and I think I'll concentrate on miniatures until then.
On 11/14/2017 at 11:27 AM, noel said:wow! thats alot of work,not to say its not worth it it looks fab! how many Hours to make this?
Thank You. Hum, I think it took me about five weeks of daily work for 2-3 hours.
On 9/9/2017 at 10:17 AM, Ray said:This is amazing. Please keep the pictures flowing!
Thank You
On 8/22/2017 at 9:09 AM, klatschi said:Wow, this board is so fantastic, I love the barracks especially, with all the different small angles and the small niches and stuff. Two thumbs up for this work!
Nice to hear, thanks
On 6/28/2017 at 10:20 PM, Nikodemus said:Pretty little things! You seem to prefer a less bright paintjob than I do. Eager to see your take on Misaki.
Thanks
 Yes, I like desaturated colours.
On 11/21/2017 at 7:12 PM, rober695 said:
Yes, I like desaturated colours.
On 11/21/2017 at 7:12 PM, rober695 said:If you don't mind me asking...how do you do the brick work? Same as the road tiles. I see you make your big cuts with what appears to be a hot wire cutter. But unsure how you do the scoring.
On 11/22/2017 at 11:31 PM, Stonewall78 said:I have seen a lot of people just use a ball point pen to make cobblestone/brickwork. I have found it works myself but it depends on the pen and effect you are going for.
On 11/23/2017 at 1:18 PM, Butch said:In germany we have something called the Vollmetallischer Universalstrukturierer (full metal ubiquitous structuring tool). Maybe he used one of those.
The technique with the ball point pen is used very often by Gerard Boom. But he has other very interesting techniques too.
(the vidoes are in german, but you sould easy understand what they're doing just by looking at it)
Butch nailed it
Brick work: it's three steps: 1. pencil 2. knife 3. pencil.
Regards
-
On 27.4.2017 at 11:32 PM, ChrisB76 said:
Wow this really looks amazing. Absolutely love it.
I am just curious how it will be to play on it. Atnospheric for sure
But you have a lot high blocking terrain do you think this will be a problem?
Is it still possible to reach the models in these narrow streets? I think the photo give me a wring impression here
")
Thank You
My plan is to build narrow streets with many buildings. I'm not a tournament player and the people I usually play with don't mind the amount of the terrain. BUT:
I must not place everything on the board :-P
There are no terrain updates from me :-/ Currently I'm painting some miniatures. I still have an unpainted Misaki crew and plenty Outcast models and because my painting motivation is quite high, I think that I'll paint some more time. So maybe in autumn or so I'll continue with the further buildings :-)
Here some quick-shots of my recent miniatures:


-
6
-
-
@Travis
Humm, seems reasonable. How do You deal with the Scion-unbury? Is Tara’s reactivate her only way to get unburied?
Regards
-
On 29.3.2017 at 10:12 AM, ArcticPangolin said:
I just messed myself even more. This is going to look AMAZING altogether.
I especially love the effect of the cobbled road running through the building's courtyard, but seeing it all come together in that all-too-familiar colour scheme just gets me all hot and bothered. Crews will stand out nicely on it too.
Thank You, I'm very pleased
 On 29.3.2017 at 3:32 PM, Eriekiels said:
That looks fantastic, well done and keep up the good work. I never felt i was up to the task to make a decent cityboard like the one you are making.
Thanks :). Never say never ;). I don't think building this stuff isn't that hard; it just takes some time.
On 22.4.2017 at 9:17 AM, MrEncanis said:You are doing amazing work. Thank you for sharing, I can't wait to see how it turns out!
Thank You, too!
So have a further look
_________
The beard elements are done. So are the buildings around the squares (project name "The Two Squares" :-P).


Next up will be the second tower.
-
4
-
-
Your board looks great and it has a lot of details, which make it appear "living"
I'm interested in how do You handle the water in the game? Is it passable? If so, you somehow reduce the movement?
Regards
-
Looks great with lovely details
I like the "spiky rocks" very much!
-
On 1/25/2017 at 7:32 AM, ArcticPangolin said:
F*** off, that's amazing. Really love your work.
Thank You
On 1/25/2017 at 11:15 AM, Nimo said:Very nice! I like buildings with an inner courtyard. Mabye i'll have to try something similar soon.
The roof looks somehow a little bit strange, in my opinion. Maybe it needs to be a little bit bigger to jut out over the walls.
Thank You :). If You'll do so, let us see your work
_________________
Progress is being made - slowly :-P
The buildings around the two squares are done for now. There are no detail works (like lanterns) yet. There will be some better pictures when they will be completed.
Right now I'm working on the street tiles.


-
7
-
-
On 1/7/2017 at 2:06 AM, Burnin' Coal said:
Am loving this board and all the skill and dedication you are putting into it...thanks for sharing
On 1/7/2017 at 2:12 AM, necroon said:Wow this is really great work! Thank you for sharing!
Thank You both. It is my pleasure to show You some photos (and to get some kind words :-P).
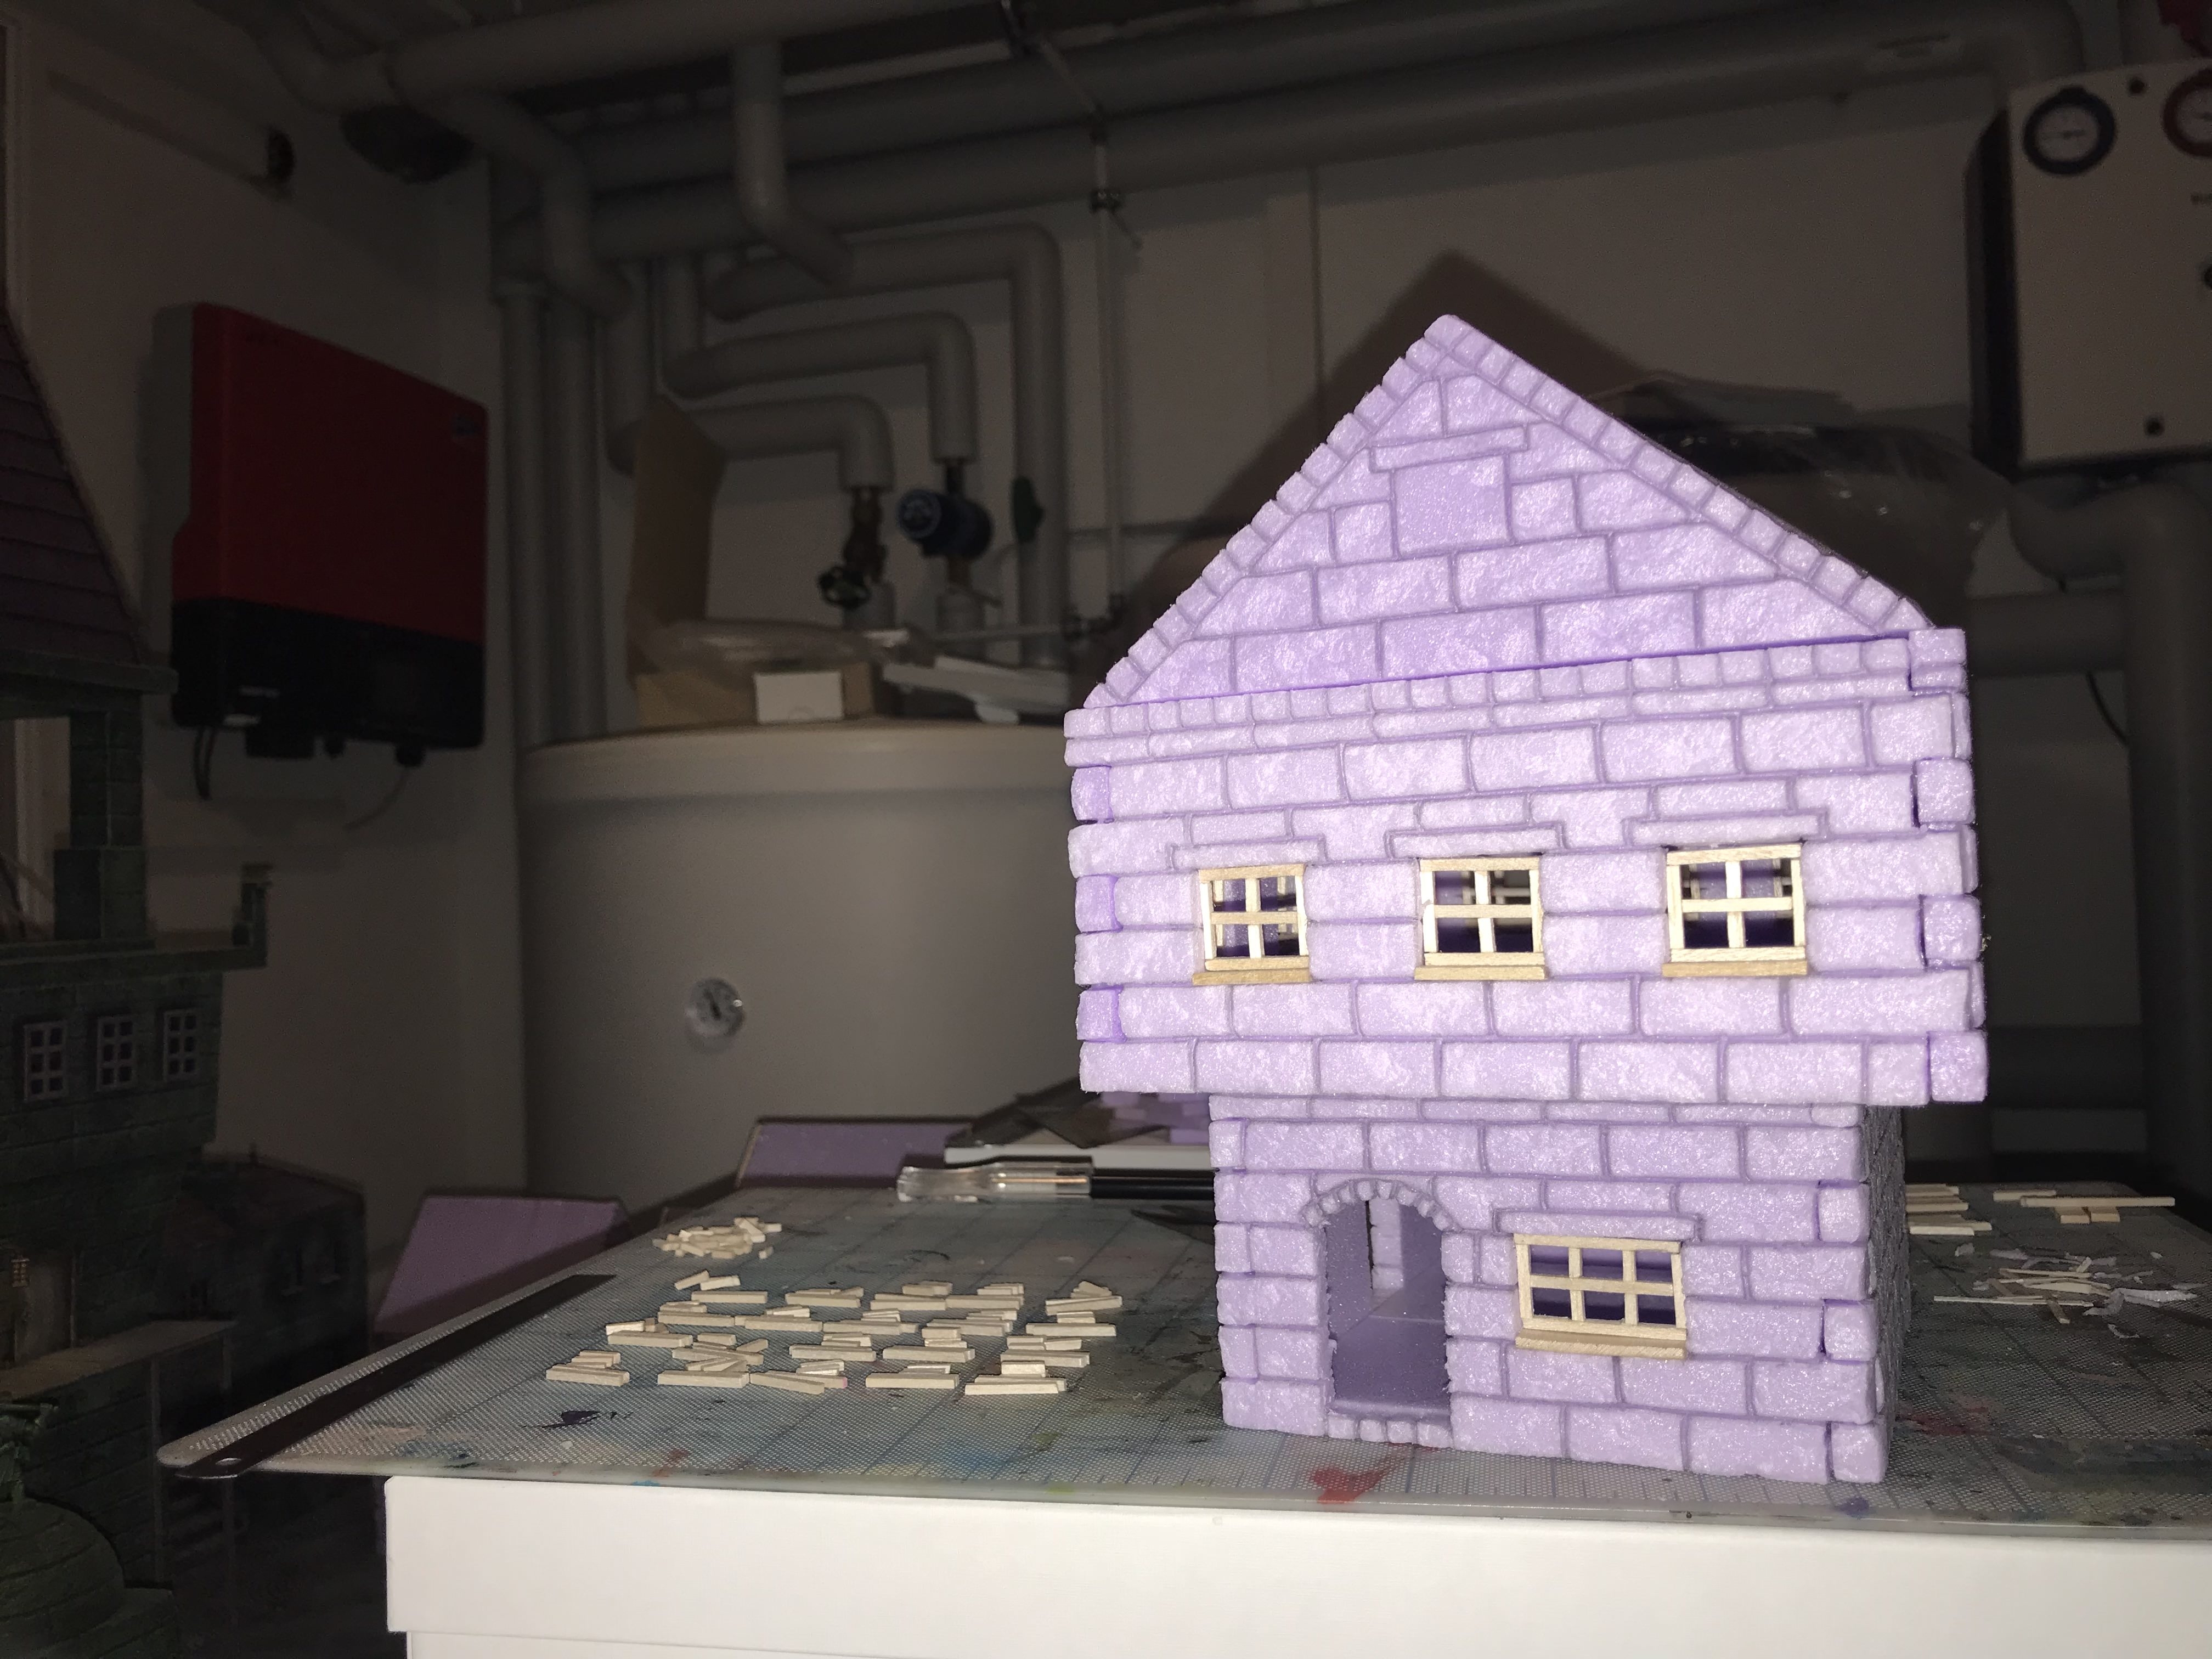
So lets continue; I glued the walls, cut the window and door holes, did the roofs. Lets have a look:


Next I will make the doors and window frames, prepare the two board elements and then do the paint job.
-
5
-
-
On 12/1/2016 at 9:15 AM, Kaos said:
I love this board.
Not for the uncanny display of craftsmanship (well done on that side) but because I think you caught the creepy atmosphere perfectly.
Just a small note: I would have loved if you would have put in the gallery all kind of creepy small paintings.
When you posted that image of the models inside the building it was gold. I hope you will make more buildings with creepy details. Something not too big and obvious but something small like a Easter egg, something that make you say "that's so cool" when you find it.
10 out of 10 and waiting for more.
Thank You
I'm not sure how many details the upcoming buildings will get. Details take a lot of time and I would like to get the board to a playable state in 2017. So maybe first I will build the buildings to a raw state and add the details later (I'm afraid that I won't get motivated to add details after I finish the raw buildings, so I'm not sure how I will handle it).
______________
The last months I painted my Tara Crew and just recently I get back to build some buildings
Right now I'm working on buildings for two 1 ft * 1 ft bard elements. They will have another tower and some flats or barracks or something similar.


 .
.
-
4
-
-
I like Your various projects and I am curious to see how this one turns out
-
On 11/15/2016 at 5:48 PM, ringsnake said:
Given that you've got Grimwell in it, you should call your building number two "The Sanitarium" since it really does look like one anyway.
Hi
Yes, first I wanted to build a sanitarium in this style. But then this image:

caught me. maybe I'll build something like this but a bit bigger, with more rooms as a sanitarium
__________
So, what is happening? I had a game at a friends house. So I prepared

a few miniatures (Tara crew, Rasputina Crew and Lady Justice's Death Marshalls for Tara) an started painting them:


Further I had no own scheme markers. So I had to make some. They aren't painted yet.


But just before I started painting the miniature, I finished a minor terrain piece, namely "The Monument".


It shell be the monument You can see under the moon on this picture:

Next, I will paint some more miniatures.
Regards
-
6
-
-
Yes, I like it :).
Maybe You could apply some weathering effects to the roofs; I thing I would try a dark wash at places, where rain would flow downwards. Od at least I would ad some thinned dark color in the edges and drybrush the rest with a lighter color.
(Maybe You already did this, but the photos eat up some of the contrasts)
-
On 11/8/2016 at 6:49 PM, gewaltatron said:
I am not a big fan of the green walls but, the details and the constructions are AMAZING! I take of my imaginary hat (which is bigger than all of your hats!)!
Thank You :). Yeah, I can understand that You don't like the green walls. Before painting I was sceptical, too. But then again I wanted to try something different than the standard-grey-walls. Right now I like the outcome
. I'll consider the color scheme once again when the whole board will be done (which will take a loooong time I asume :-P ).
On 11/9/2016 at 2:17 PM, .Per. said:Would love playing on this board, pure gold!

Thank You, Sir
On 11/10/2016 at 4:45 AM, prof_bycid said:The little paintings on the wall and the cover image in one puts this beyond amazing. You really captured the buildings in the images well.
Thank You, I appreciate Your kind words
On 11/12/2016 at 10:05 AM, Sandmann said:Very cool details! Where are the raven from?
Thanks
The ravens are from HQresin: https://hexy-shop.com/shop/accessories/modelling-basing/fantasy-mb/ravens-basing-kit/ (there may be other sources, like e.g. www.battlefield-berlin.de).
First I wanted these ravens: http://www.tabletop-art.de/Raven-Set , but they weren't available when I needed some. There are a few shops distributing stuff from Tabletop Art.
Regards
-
- Popular Post
- Popular Post
On 11/3/2016 at 9:52 PM, Somnicide said:Wow. This is really inspiring, thanks!
Happy You like it
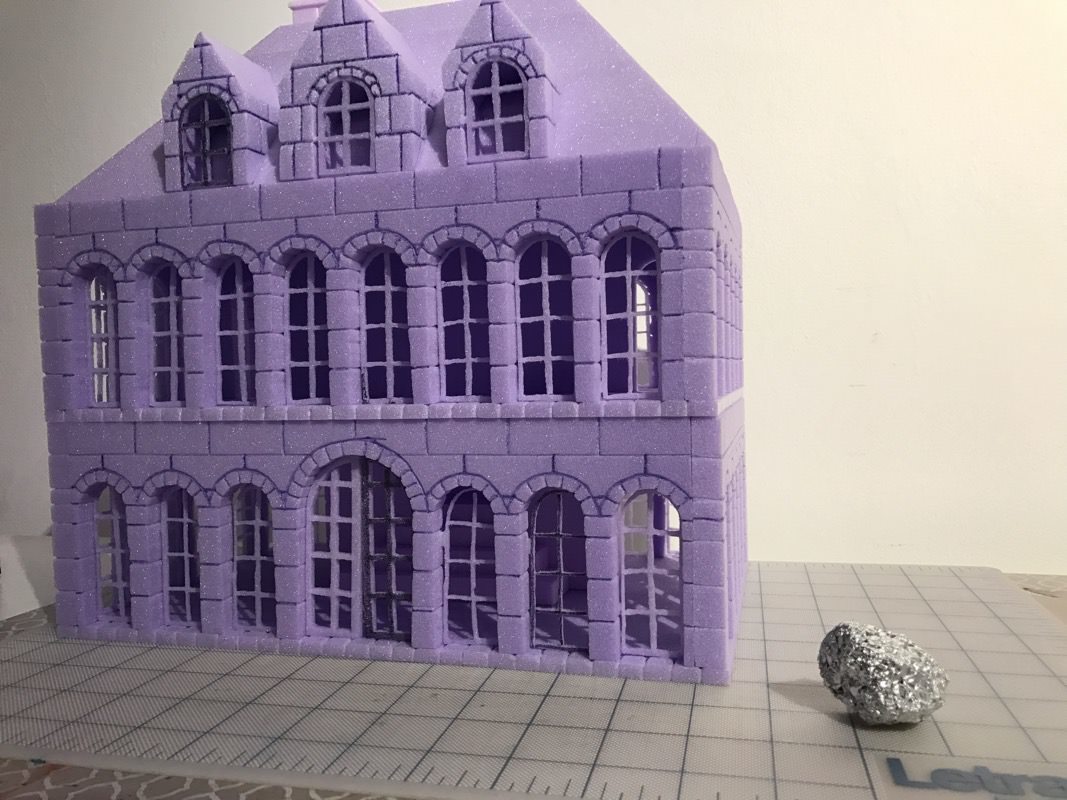
On 11/6/2016 at 0:28 AM, Eriekiels said:Very nice creations, but I am wondering, aren't you afraid, it will break easy. I mean that house just looks brilliant but the windows look very fragile.
The tower looks awesome, can not wait to see more, keep up the good work
Thank You :). Yes, You are right. The windows are fragile - but not so much You would think. I mixed a lot white glue to the paints so this gives them a bit more stability. Still they are fragile.
The buildings are for private use only so I hope that dealing them carefully will let them life a long time :-P.
___________
I finished the details on the "Art Gallery". I added the paintings inside, some information tablets at the door, lanterns an lightning. A raven sits now on the roof, too (as do two at the tower now, see the first picture).


P.S.
Here are my inspirations for the buildings (open spoiler):

-
11
-
And the (almost) finishing steps:

The front.
___________

The back.
___________

Ground floor.
___________

Upper floor.
___________
I used only drybrush techniques to paint the walls. For the roof I used a red, than a pink and finally a beige.
For the walls i applied a darker green, a bright green, than darkened again with black and added some diversity with a brown.
I painted the windows with a dark brown and drybrushed with a lighter brown (only from the outside).
The parquet: First I pained it with a strongly water thinned dark brown. Then I painted stripes on it with thinned washed (light brown wash, dark brown wash and black wash).
Some minor details are still missing and I hope I will get them done in the next few days
-
5
-
-
On 10/11/2016 at 9:59 PM, Frozen Feet said:
Pretty amazing!
If you ever want to get rid of that Board..... PLEEAASE CALLL ME!!
Looks absolutely beautiful... but a little, hhhm, let me say: time-consuming.
Great job
Thank You
Time-consuming? Yeah, that's true..... ;-P
On 10/11/2016 at 11:54 PM, Burnin' Coal said:Man this is going to turn into a master class...and the whole board will end up superb...really enjoying following your progress
Thank You, too, Burnin' Coal.
On 10/12/2016 at 4:39 PM, Gremlin66 said:Keep them coming. Those are great.
Happy You like it
On 10/12/2016 at 5:13 PM, Adran said:Wow, the work on the windows...
These look like some amazing buildings, very atmospheric. keep them comin
I will :). And thanks.
On 10/14/2016 at 6:53 AM, Sandmann said:Amazing stuff.
I am in awe that you made the windows out of foam too. That is insane! But in a good way
Foam windows seemed to be a fast way. But it appeared that wooden ones wouldn't take much more time :-P (but they would have been more stable).
Thank You
On 10/26/2016 at 5:24 AM, ArcticPangolin said:Totally bonkers! Well done SilentSeeker
Thanks
__________
So lets see what happened in the last two weeks:

Roof tiles made out of balsa wood and glued with white glue. I cut the overlapping tiles with a knife.
___________

I made the floors out of balsa wood, too. To prevent curving while gluing i moistened the wood with water on the face up surface too. It appears, that balsa wood spreads into the width when strongly moistened, so i had to cut it a bit more.
___________

The roof again.
___________

The finished roof and some decorative stripes.
___________

The inside of the ground floor.
___________

The inside of the upper floor (roof floor is not playable).
___________

Everything primed.
-
2
-
-
Looks very promising
I'm excited how the board will look like when it's done. Keep on going!
-
- Popular Post
- Popular Post
Right now I am working on “Building number 2”. That ist the official name for now :-). Artwork knowing people (or gallery watchers) might guess which building it shell become


-
12
-
On 10/6/2016 at 8:17 PM, Sandmann said:
That looks very promising
!
Thank You
On 10/6/2016 at 8:21 PM, Burnin' Coal said:Oh wow ! I'm onboard for this one...looks great already
Thank You, too
On 10/7/2016 at 11:57 AM, DrEvilmonki said:So how do you do the brick work in the foam? Is it cut or scored?
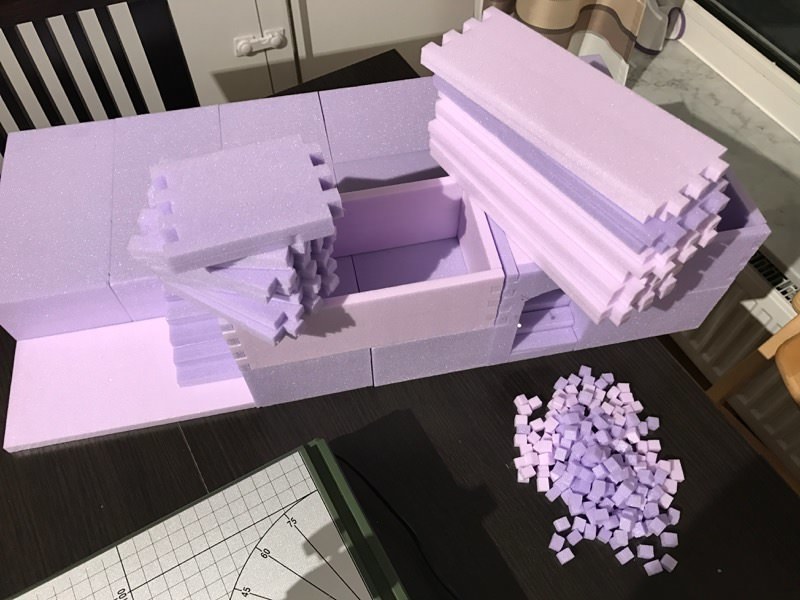
First, I draw a line with a pencil or sometimes a pen (with a ruler). Then I cut long the line with a knife. And again I draw along the line with a pen/pencil.
For the latest building (the background building in the last picture) I tried something new; I pushed a slim metal ruler into the foam with some amount of pressure.
On 10/7/2016 at 5:17 PM, Gremlin66 said:Looking good. Great work.
Thanks
On 10/7/2016 at 5:25 PM, Legba said:Love this! I think that just because something may require you to RETHINK how you play on it does not make it unusable. The tower is large, yes but totally goes with the setting! I have wanted to do a downtown board for a long time. Keep the pics coming!!
Good to hear
. I'm quite new to Malifaux so I'm not exactly sure how the buildings will affect a "normal" game. We will see.... :-P
So, just do it - the downtown board ;). More people making Malifaux terrain is nice for inspiration
Pics will come!
On 10/8/2016 at 5:38 AM, Bazlord_Prime said:Yeah, and the weathering effect on the stone blocks looks great! How was that done?
Awesome work, & thanks for sharing
Thank You
The "weathering" was easy: there is none :D.
First I painted the foam all black. Next I dry-brushed the walls twice with a darker green. I did it again with a lighter green, but only here and there. And last I dry-brushed the walls with a light grey, but only at a very few places.
(grey is not in the picture)

-
3
-
 1
1
-


 .
.


Night in Malifaux - Building A Malifaux City Board
in Terrain Talk
Posted
And here comes the board - done for now. Details and decoration will follow over time")