

Sagrit
-
Posts
272 -
Joined
-
Last visited
-
Days Won
1
Content Type
Articles
Profiles
Forums
Gallery
Events
Downloads
Posts posted by Sagrit
-
-
Well yes, Yin is a person from mythology
") As well as lots and lots of other models in Malifaux Datsue Ba, Onryos, Izamu, Ama No Zako, Jorogumo, Asami...Almost all Ten Thunders to be honest
As well as lots and lots of other models in Malifaux Datsue Ba, Onryos, Izamu, Ama No Zako, Jorogumo, Asami...Almost all Ten Thunders to be honest
-
 1
1
-
-
Let me make an advice different to Maniacal_cackle
Not that he's wrong, it's just another opinion.
1) I must say, that Kirai indeed has lot of options, but overall game style is pretty straightforward. At least when you are just starting. The main idea - your opponent must fight with your summons. As long as he's spending AP dealing with summons - your are OK to do Schemes and Strats.
2) If you are mono-master only i would suggest such list for the start:
- Kirai (+Whisper)
- Ikiryo
- Datsue Ba (+Whisper)
- Lost Love
- Seishin
- Seishin
- Onryo
- Onryo
- Manos (+Upgrade)
Last slot is really depends on your model pool and Schemes and Strats. there are lot of alternatives there:
- Dead Rider - mobility and a good beater
- Toshiro - overall good model with Minion heavy crew
- Anna Lovelance - good auras against Place heavy opponent
- Carrion Emissary - nice for Research Mission
- Yin - nice for Take Prisoner
- etc
This list playstyle is pretty straightforward - you main idea for Turn 1 is to give Fast for Ikiryo, move her with Seishins and Datsue Ba and charge in the middle of opponents crew as soon as possible. The goal is to do some irreducible damage and leave a model with Terrifying and Vengence engaging key enemy models. Opponent will have to deal with Ikiryo, spend some cards for Terrifying and get some damage from Vengence. If Ikiryo is killed - that's awesome for you. Activate Kirai, summon new Ikiryo, summon something more (Goryo, Shikome, Drowned) and send Ikiryo again.
Your 10SS model go and do something useful for VP. Onryo here for Adversary and scheme-run. Lost Love for Fast and also By Your Side in the proper place. Seishins give extra Move and heal Kirai and other models. Datsue Ba here to finish off models, protect Kirai or even charge in melee with Lantern aura.3) If you are in multiple-master meta - drop Onryo and 10SS model and take Molly. He's super good with Kirai because Kirai need cards and Molly can give it. Also some Irreducible damage and Slow source is always good.
-
 1
1
-
I love Kirai
She might not be the top-tier master in competetive meta, but she's definitely strong and fun to play. @Maniacal_cackle is right in his points and i just want to add some more:
- Lot of incorporeal - you can use it very effectively to move around the table and also to hide when you want to.
- Irreducible damage on Ikirio. I had games when Ikirio just killed opponents master on Turn 1 (with good cards and lot of Masks of course).
- Datsue Ba have Lantern Aura and it's nasty against lot of models. Combine it with Manos and it's almost a quarter of Table with no Demise possible.
- Goryo is very strong summon. For opponent It's hard to ignore them and when he's trying to deal with them, he will spend lot of AP and take some damage back.
-
Lot of additional movement. I mean like really a LOT For me it's really fun and effective to gave additional move all around. After all many Schemes and Strategies say that you must be in some specific place
-
1
-
21 hours ago, Graf said:
c) Transmortis has only light healing capabilities, usually they don't have enough SS to include any or at most one healer. So hit them hard, Armour 1 can do only so much and it's not even on all models.
Agree with everything except of this
I would say that Sloth is pretty common pick in Schtook's crew because of crazy good heal and making lot of models Fast
-
15 hours ago, Adran said:
I don't disagree with your points on crew construction, I even remember the first edition rules that allowed you to sacrifice your own crew to gain soulstones, and how that made so many schemes trivial to deny.
I understand it might not feel right, but I will still say the difference between Hazardous and Falling, is that 1 of them is explained in the rules to not count as anyone killing the model, and one of them needed to be clarified in the FAQ who it counted as being killed by.
I am saying is that it is much much harder to build a crew that can use hazardous terrain to deny bounty points, than it is to build a crew that can use conditions to deny bounty points, to the extent that they specified killing with conditions will still earn you bounty points. There are 3 choices - Firstly the board has hazardous terrain, in which case both players can try and use the tactic.
Secondly -You create Hazardous terrain - I think there are 5 ways you can do that in a way to hurt your own crew - Pit Traps (spread over 3 factions), Von schill (land mines), Drowned, Mysterious Emmisary and Ice Golem.
Thirdly, your opponent creates hazardous terrain/auras. This is outside your control.
Even after you have created the Hazardous terrain you need to be able to use it to kill yourself, so you need to not be killed by the enemy attacks. And the ways you can create hazardous terrain to kill your own crew can also be used by the opponent about as easily.
Maybe I'm wrong and it really is trivial to kill yourself in way to deny public enemy points, but I don't think that anyone has demonstrated that it is common or easy to do. Its probably easier to make sure your model is outside of LOS of any enemy models, which will also deny those bounty points, than it is to do it with hazardous terrain.
Sure Adran, you are right that it's not a common issue. I don't think it's smart to actually plan such thing as creating Hazardous for your own models. I'm just saying, that it looks like hole for me and when we are talking about holes in the rules it doesn't really matters how often can they be used
It's again same with Falling - you can't plan a falling damage in Public Enemies, you actually can't create something high enough and you can only rely on original Terrain on the table. So for me it looks even more rare than Hazardous. But still it was clarified
-
In our current meta (mostly online because of COVID) the first question when choosing a master and thinking about roster is : how do i score Strategy. And the second question: how i deny scoring for Opponent. All other things like how to score Schemes, what synergy do i want in crew etc - it's following questions, not the main.
For example for Public Enemies it's a common idea to hire Minions only cheaper than 6SS and all models hire than 6 must be good protected and must have a really good reason to be hired (read it like be pretty good in killing).
I'm sure, that lot of us remember that it was pretty common in M2E to kill your own models (or a whole crew) to deny opponents scoring. Now it looks the same - with Public Enemies i would look for a way to finish off my models so opponent can't do it. I can't say that it happens in every game, but i would definitely use such option. It's just doesn't feel right.... I mean, it's pretty similar to die from fall damage - make a suicide jump is pretty similar to make a suicide step in't fire. But one case is covered by rules and FAQ and other is not, that what make me feel that it's some kind of mistake, not a design.
-
It's not just about Yan Lo of course. There are plenty of Hazardous sources in all factions and im not even talking about Terrain itslef
You are absolutely correct about holes in the rules, but it's very easy to fix with FAQ, really
We already have questions 8 and 9 that clear the simillar situation with Conditions, Burry and Fall damage.

If Wyrd want it to work like you said (no Bounty Token) - it would be awesome to just add it to #8 - "(such as End Phase Condition Damage, being Burried at the end of the Game, or being killed by Hazardous Terrain)"
If Wyrd want it to work in opposite way - it would be awesome to add it to #9 - "If a model is killed from falling damage, or by Hazardous Terrain, who is treated as killed by?"
We can play in both ways, it's not a problem. And both ways could have fluff explanation of course. But now it's just not clear and looks like a hole that someone forgot to bury
-
So, is it legal to kill yourself with Hazardous to prevent Bounty Tokens for an opponent?
Let's say my model have 1WD (let it be Hard to Kill result). I can't attack this model with my other models, because of Public Enemies wording. I can't rely on Conditions for the same reasons. I can't take a Walk or other move to fall down from High Terrain because of rulebook wording. BUT i can walk into Hazardous terrain (let it be Yan Lo's aura) to kill my own model and prevent Bounty Token?
Let me be honest - for me it sounds silly
-
On 8/9/2020 at 3:48 AM, Maniacal_cackle said:
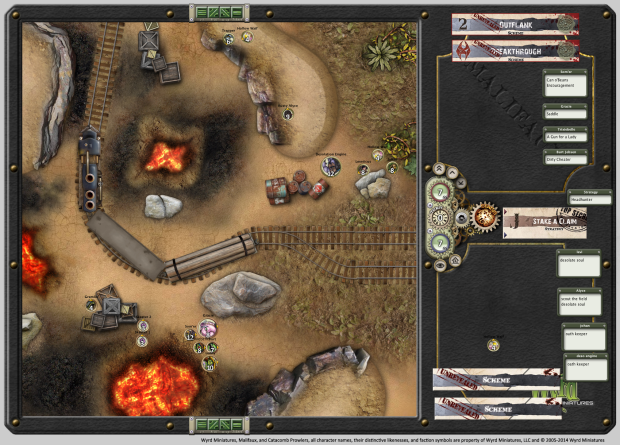
What do people reckon about this board?
What sort of crews does it inspire you to take? Which part of the map do you think you'd want to deploy in?
When I played it, I had Molly in the top right corner. Claim jump was a scheme, and the centrepoint falls in that nice clear area in the centre. Dead Rider and Archie gave me some solid maneuverability, but getting out of my deployment zone was difficult. Molly got a nice vision boost from the hill, which was awesome.
If you are the attacker, you can be pretty flexible with who you select into this board. If you're the defender, you're likely going to find yourself behind those trains, and need some serious gas to get past that terrain (either climb over it, or incorporeal models, or models with leap/flight are fantastic here). Note that incorporeal models like Hanged can struggle to get past that rock by the train because it is big (more than 4 inches), so they can't get through it in a single move.
I played on this map yesterday. My crew vas Von Schtook, pretty classical, with Valedictorian, Emissary, Undergraduated and Necropunk.
Strategy - Symbols of Authority, Corner deployment.
I feel pretty good on upper right corner. But I would say that lower left corner was better for the strategy - my opponent placed 2 Symbols in Hazardous terrain. It wasn't and issue to be honest, but still a nice trick.
The biggest issue was a 4" Stone on the lower part of the map. 4" trains are OK but Stone + Train formed a big piece of very high terrain, it was tricky to tak LoS there.
I have lost that game for 1 VP because of scmenes - i took Claim Jump for a Necropunk with GST and he was destroyed in the beginning of the 2nd turn by The Brewmaster: Lure (2 poison) -> charge with 8 stat -> hit with 8 stat -> blow up poison. So i cant score even 1 for that scheme. As for the crew i would say that Transmortis was completely OK with terrain on the map. Emissary helped a lot with protecting Symbols.
-
1
-
-
Maybe it's a mistake, but, to be honest, i don't consider Terrain while choosing a Master. The only exception is Seamus of course.
But as for this exact map - you are right, it could be a pain to get stuck in bottom-left corner. I would say Urami and Transmortis will still feels good because of Incorporial, Flying and By Your Side placing. With such terrain heavy maps i like to choose Vendetta with Incorporial model. Onryo in Urami crew for example. Just hit once in correct time, score 1VP and use terrain to hide for the rest of the game.
-
1
-
-
In my opinion Bone Pile doen't fit. Von Schtook remove conditions like a pro and also turns Corpse markers to friendly Scheme markers.
-
1 hour ago, ArD said:
Ticket for Ilya Udovenko(Russia) is paid today.)
That's me
Thank you for help with PayPal
-
1
-
-
Sure, that's true. I will try to play the list this weekend. My opponents are usualy focused on killing, so it's a really nice challenge since i do realize that such list is squishy. We'll see how it goes
-
1
-
-
2 hours ago, unti said:
The last schemes and stones podcast showed how many models there are per faction with ruthless: https://schemesandstones.wordpress.com/2020/07/10/by-the-number-part-2/
So you should be fine against outcast and neverborn and maybe against bayou and arcarnists because these factions have very few options for ruthless. Against ten thunders, guild and ressers you probably should consider another list....
Definitely not against Bayou because of Inferriority Complex Upgrade. Ruthless is something to be aware of for sure. But not something that would change my mind. Just change target priority
GST is not just Terrying, it's also Regen +2. Dead Doxy with HtW, Regret and Regen+2 is not a model that will die quickly. What i truely afraid of is not Ruthless, it's high range shooting... -
That's a nice one! I would like to play that pool and test some things.
The list i see is Redchapel
Size: 50 - Pool: 6
Leader:
Seamus
The Whisper
Totem(s):
Copycat Killer
Hires:
Dead Doxy
Grave Spirit touch
Rotten Belle
Grave Spirit Touch
Carrion Emissary
Bete Noir
Yin
The idea is to play around Schemes. Seamus, Belle, Doxy, Yin provides a way to move opponent's models as you would like to. Redchapel keyword ability Scarlet Temptation helps a lot with it.
So i consider Runic Binding a good choice.
Take Prisoner easily done with Yin most of the time.
Research Mission is not a big problem with Emissary and Seamus.
Spread Them Out - Seamus and Bete.
Vendetta also an option but depends on opponent's crew a lot.Because of Strategy I assume that opponent whant to hit us hard and be in melee range. The problem - our models are pretty squishy. The solution (kinda) - now all of us are Terrifying, so please be prepeared to loose some cards and fail some actions. Scarlet Temptation also help's with that.
Because of Sceme pool I can emagine that opponent will place some Scheme Markers and that's why Bete is here to deny.
Things to be aware of - focus Ruthless models with Seamus. What I'm really really missing in this list - Sybele for extra movement and min 3 dmg and Nurse for healing, removing conditions and extra Focus for Seamus. But i don't see what to remove to get SS
-
2
-
-
Quick question about simmilar situation
Kirai have Protected (Urami) and does not have Terrifying.
Datsue Ba is Urami and have Terrifying 12.
You want to hit my Kirai. I discard a card and use Protected to switch attack on Datsue Ba. Will you get Terrifying check?
My reading of the wording - yes, you must do the check, because now you are targeting a model with Terrifying and Terrifying wording says "After an enemy model target this model with an Attack Action..." -
On 7/11/2020 at 12:08 AM, Maniacal_cackle said:
I like how vengeance makes Let Them Bleed very likely, as long as their models attack things
I find it a bit tricky on corner deployment, but Kirai has good board coverage and has a good shot!
Catch and release also looks great. Any idea what list you'd take roughly?
I would start with something like this:
6SS
Kirai
+ Whispers
Ikiryo
Datsue Ba
Lost Love
Seishin
Seishin 2
Seishin 3
Onryo
Onryo 2
Manos
And there is 2SS for Upgrade. It could be Whispers for Datsue Ba, or Killer Instinctfor Manos in case of Terrifying heavy opponent. Or even both upgrades minus one Seishin.-
1
-
-
I would take Kirai and look for Catch and Release & Let them Bleed.
Urami has no problem with Symbols and i probably would hire Manos if i play mono-Master (if not - there will be Molly in list and it will be easier to summon Shikome earlier)
Catch and Release is not hard at all cause our Minions are Incorporial and we have lot of extra movement. I always hire 1-2 Onrio so the are OK for this scheme as well. And it's easy to get our Minion back from engage and hide them with their Incorporial
Let them Bleed just fit's my Uramy general playstyle - do pressure on your opponents Master and most expensive models with buffed Ikirio and summoned Goryo.
-
1
-
-
Kirai feel fine because her Summon is a bit stronger and faster and because Vengence is a thing in crew with low wounds.
Von Schtook feel fine because of his and Anna's Auras and also because of crazy fast crew.
I would say Jack should feel fine because of Staggered and hand pressure, but haven't try Jack-Dreamer matchup yet. -
Hmm... that's an interesting point. I must admit that i lack experience with Yan Lo both in M2E and M3E, but yesterday I played him for the first time and Retainer crew looks extremely mobile. So much pulls and moves outside of activation. Yan Lo, Chiaki, Soul Porter, Gokudo, Yi, Manos, Izamu - all of them have some movement shenanigans. Yin died 2 times in yesterday game and still came back on the last turn and scored. It was done on porpouse - she soaked lot of resources, lot of cards because of Terrifying, lot of activations because of 9 Wounds and self heal.
As for Take Prisoner you are absolutely right. Yin score it easely.-
1
-
-
Nice, thank you 🤝
-
Take the Hit: After an enemy model targets a friendly model within a2 with an Attack Action, this model may discard a card to place itself into base contact with the friendly model and become the new target of the Attack Action (ignoring range, LoS, and targeting restrictions).
A model is friendly to herself. The model is affected by her own Aura. Does it mean that a model with "Take the Hit" can discard a card to be placed in BtB to herself?
-
In M2E I hire Yin in Seamus crew pretty often. In M3E there are still a place for Yin in Red Chapel.
But i would like to ask you, how are you using Yin in Yan Lo crew this days? I'm not familiar with Yan Lo at all, but it seems his keyword have lot of good and expencive models and I'm simply have no stones for Yin ... -
I'm not sold on the idea of hiring Mindless Zombie just to give Focus+1 turn one. Even if it's Focus+1 for several models (which is nice but not really necessary to be honest)
Pros:
- No need of corpse generation like Mourner, Gravedigger, Dead Dandy, could save some SS not hiring those models
- Extra activation
- Can deliver corpse marker 8" away from Deployment zone (no idea why you'll need it)
Cons:
- Still need a Blasphemous Ritual, probably GST on some model (not an cons actually, great upgrade)
- You probably will give opponent pass token turn one
- It literally means you buy only Focus+1 for 2ss (which is a cost of Upgrade for some other model)
My thoughts - if you really need a corpse Turn One, just hire Dead Dandy, it's a great model for only 4ss, it will help you deny opponent's schemes, it will help you with Redchapel Killer ability.


New Player kindly asking for advice!
in The Resurrectionists
Posted
As for buy list i would say that you also want Sloth. It's just 1 model from Crossroads box, but if money doesn't matters - buy it. Or you can check EBay or other places for a separate model of Sloth. Or you can share Crossroads box with your friends because every faction would like a model from that box")
The reason is that Transmortis are pretty fragile to be honest. You want extra heal and Sloth will give 3Wd heal without any card flips as a bonus Action on 10" range. The downside - he will also give Slow to your model. The good side - Von Schtook removes conditions with the same action that he use to give Fast. So Sloth Heal your model with Bonus, Von Schtook removes Slow and gives Fast instead. Also Sloth can give Fast to friendly Undead as well, so it allows Von Schtook to do something else instead of being pure support