

EricJ
-
Posts
3,255 -
Joined
-
Last visited
Content Type
Articles
Profiles
Forums
Gallery
Events
Downloads
Posts posted by EricJ
-
-
So far I'd rate them as ok, not great, but not bad either. Potential, I'll watch to see what they come up with down the road.
-
The fire Sorceress should be good, and I imagine the crypt vampire girl will see a lot of painting.
the 4th and 5th ones here look like the sculpting quality is a little lower than the others (although I think they're stuck between Chaz Elliot and Werner, which is tough to compete with, if I can recognize my sculptors right)
-
Anyone else have pets that have adverse affects on their painting?
As some know I have this evil little kitty:
Well anyway, last night I'm painting away on my banner elfy and she wakes up from her 20 or so hour nap for the day and wanders over to see what I'm doing. First she starts scratching the back of my chair, which of course shakes me while I'm trying to do fiddly freehand on the stupid elf. Then gets her claw stuck and meows like crazy until I help her get unstuck...not so bad, a few mistakes to correct and a little delay in painting.
THEN she decides it'd be brilliant to jump up onto my desk right in front of me for attention...well she lands in the paint water, spilling it all over my Laptop, then jumps back, off the desk, just barely catching herself with one set of claws into my arm...and now she's stuck hanging off my arm

So I'm not sure if I should clean the water off the laptop or clean the blood off my arm which is already run down to my hand.
Needless to say, painting didn't go real well yesterday.
-
hmmm, I'd take sides here, but I'm not yet sure which of you it's more important to be on the good side of...so for now, I hope you 2 beautiful ladies work it out

-
he sort of has the attitude of:
"*sigh* ok, I guess I have to shoot another guy, alright, I better get to it"
-
nice complete article, you really captured the step by step process of how to do the mini. Great work

-
yeah, I agree, sometimes a mini has to "play it cool"
to me this mini isn't dynamic, but also not stiff, which is usually the opposite of dynamic in the miniature world. He has a very natural pose while also remaining very calm.
-
yeah, we'll show those wizkids guys!
...by painting their minis wonderfully and giving them free possitive advertising...
I'm sure it'll really sting

actually it does sound fun, and I sort of like being able to one up the studio paint jobs...one of the reasons I have yet to paint a Rackham, I'm intimidated!
-
I want some too, that would be fun to paint!
-
if you buy it, be sure to get the one with green felt!!!
It's totally worth it though, if you like the muppets
or you want to make your kids like the muppets
slip in some "Meet the Feebles" every now and then though
-
remember that Simpsons episode with the makeup shotgun? Maybe we should develop and market one for miniature painting studio jobs!
-
I got the DVD, but I'm kicking myself, like a week after I got it, I noticed the one (which didn't cost any more) had green FELT on the cover was also out...okok, so it's ultimately not important, but still, green felt!
-
I have the same thought sometimes, how these companies that arn't producing anything new, or anything I'd want to buy, or anything you'd ever see in gaming stores make enough money to make it worth their while. I suppose they must since they keep doing it, but it never made sense to me either.
:bird:
-
again, Nathan might wup me if I did this before a contest entry, but I'm looking forward to seeing your test run!!
But I do think that paint jobs do a lot for a miniature range, particularly when just getting started. Rackham used world class painting to rocket theselves from nothing to being basically the #2 out there. Dark age is doing very well also, I believe due in part to their painters. I think once you're established it does ultimately come down to quality of sculpts, but until people know your name, and mini range, you need something to catch their attention. Thats just what the paint jobs do
And tell wiz kids to send me a pile of $$, I'll paint their things
-
Roadrunner was the best, and looney toons. They were both actually intelligent, and are still funny and interesting now when I see them, where as the crap they call cartoons now is just mindless crap showing kids doing more mindless crap...animated...
Muppets though was the best, not really a cartoon, but pretty much the height of entertainment for me...probably still is
-
It shouldn't be too hard, although Nathan might beat me up if I spent the time on that before a contest mini
-
Klute, I have to say I'm really enjoying watching your process as learning to sculpt, keep posting your greens!
-
Hmmm, I think I may have to do a bruises and cuts tutorial for the board :thumb:
On this mini I think I found a method which is both very simple and realistic
-
I agree with CL, I think she hit the nail on the head here, just look a bit old and rough by todays standards. I almost thought they looked like old edition zombie/skeleton plastic GW sprues
-
I like this one too
-
Anders, actually, the funny thing is I used to do this all the time, but now I use it much less actually, although still a good amount. Well, and also I don't think your having any trouble with smooth blends doing what you do

-
Mosch, my brush is actually not very full of paint, I don't put much on at all actually. I've heard that people in hotter/drier environments have a very difficult time doing this, since the paint dries so fast. I'm lucky and live a block from the ocean which keeps the air cool and moist even in the summer.
-
Blending without Mixing Paints
In my most recent miniature post (female cyborg warrior) it came up a couple times that I blended with thin layers, rather than mixing paints or wet blending, and I wanted to share some of the techniques I use for this as well at get feedback on others experiences. This is just the method I use to achieve this effect, but seems to work rather well for me.
The Background:
My painting is not complex, in terms of equipment. I developed without even knowing about paint additives; flow enhancers, slow-dry, etc…My tools are simply water to thin the paints, and of course the paints themselves, which in my case have always been GW citadel colors.
The Theory:
I believe that anything that takes where pigment ends up out of the control of the artist is dangerous. The most obvious example of this is dry-brushing, which ultimately leaves the artist helpless where exactly paint falls, with only a general control. However this also takes form subtly in very thin, watered down layers as well, which is the heart of this tutorial and why I mention it here. Applying very wet paint means that the drying process itself takes control out of the artists hands, especially if you only are thinning with water. As the paint dries, much like a drop of coffee on the counter, the pigment is not distributed evenly, and likely not as the artist intended, leaving either a ring at the edge of the area or uneven coverage all around. In many ways the heart of this technique is dealing with this problem.
The Basics:
The idea is a simple one. If you start with a mid-tone color, and then with a lighter color apply in successively smaller layers of very thinned paints, you start to build up highlights on top of your original color. Likewise, you can do this with shadows as well, deepening them with successive layers of thinned paint. Most importantly the benefit of this is that since each layer alone has such a small overall effect, that it puts a lot of control into the hands of the artist, allowing gradual changes, simple corrections, and frees them from relying on mixing paints and all the potential difficulties that arise there.
The Tools:
1 small brush, I use a GW Fine detail brush
1 larger (but not too large) brush, I use a GW small drybrush
A palate (not wet-palate)
Paints
Water
The Technique:(this works best on large areas, if the area is too small there isn’t room to use it)
This is a 2 brush technique, so have both ready, I tend to keep one in my mouth while I use the other, but that’s not necessary.
Step 1: Thinning your paints
This unfortunately this is something largely developed with experience, however the goal is to thin them dramatically to only barely cover. Perhaps 7-1 to 10-1 ratio of water to paint. Note the paint will not be as thin as a glaze, as you will see later, you remove most of the pigment, so you need slightly more of it.
Step 2: Basecoat
Paint the entire area in a mid-tone of the color you want, as you get more comfortable this can change some depending on the overall effect you want, however starting with a mid-tone is generally safest.
Step 3: Applying thinned paints
Generally apply your thinned highlight color to the area you want highlighted with your detail brush. Try to only apply the paint to the area to be the most highlighted.
Step 4: Removing the thinned paints
This is the important step to deal with the problems I’ve addressed above in the theory section. Once the paint is applied I do not let it dry on it’s own as that would generally leave a harsh line at the edge of where I applied the paint (no matter how thin you’ve made it), and also likely as it dried leave an uneven layer. The solution is with your mid sized brush to essentially brush away as much of the paint you applied as possible until the entire area is completely dry. This is also a feathering technique, as you can brush pigment outward from where you applied it, stretching the pigment thinner and thinner as you move further from the highlighted area. However the paint at no point is left to dry on it’s own, when you’re done with this step you’ve wicked away all the water and much of the pigment, while the pigment which is left is stretched over the highlight area, out from where you first applied the paint. This is the tricky step and does take practice, however once you’re used to it, can happen very quickly. Also note if you’re having problems with the paint running out of your control, you’re probably putting on too much paint. You just barely apply any before spreading it. (this does make it hard if you’re painting in a hot dry area where this may dry too fast before you can do this step)
The best way to illustrate it is to perhaps explain how I first came across this. I had accidentally gotten a drop of thinned paint in the wrong section of my mini, and in a panic I grabbed another brush to wick it away best I could, brushing it away best I could. It actually worked quite well, until I realized that it did leave a very faint tint of the color.
So I’ve since referred to this technique as “tinting”
Here is a photo to illustrate 2 points, the first line is thined paint applied to show how thin the paint is, the 2nd line was one I applied and then feathered and brused away. They are both done with shadow grey on white, making them seem a bit...crude, which I did it to be a bit more obvious about what is going on. (also note the first line did not dry evenly, and definately developed a line around the edges as well
)
Step 5: Repeat
Repeat steps 3 and 4 over and over and over and over very slowly building up the highlight color, apply less thinned paint each time so the pigment will stretch less and less far during step 4. This achieves a nice smooth blend.
While this sounds like it may take a long time, once you are used to it, you can switch back and forth between brushes very quickly, in fact I usually don’t have to get more paint on my detail brush for 3 or 4 repeats. Not having to wait for paints to dry has it’s advantages! I imagine though it must make for a interesting scene when in full action as I’m switching back and forth between 2 brushes every couple seconds.
Step 6: Shadows
Shadows are done essentially in the same manor, except apply paint to the area to be darkest and feather the darker pigment away from this place, again using very thinned paints. Just like in steps 3 and 4. An added benefit is also that you can add multiple colors to the shadows to give a more complex effect. (cyborg warrior is an example of this)
Step 7: Corrections
There always tends to be overlaps where highlight and shadow may not mesh quite right, In these places I will take the base coat color, and using the exact same techniques in steps 3 and 4, apply paint along the midline between highlight and shadow and feather in each direction to smooth the transition between the two
Step 8: White
The extreme highlights in this technique will likely be done with white. White, as it's devoid of the color of the what's below it, strongly suggests that it's a direct reflection of a light source and therefore very effective at both adding depth and adding a sence of environment to the model. Even if you do not want to take your highlights all the way to white, since the layers are so thin, you can stop well short of pure white at the extreme highlights. The skin of the cyborg is an example of using white to tint the skin color to simply produce a lightened version of the color underneath rather than producing a white highlight. (see the example below)
THE RULE OF WHITE: The #1 rule of white is that if you want to use it, make sure you are prepared to apply it in many many thin layers, there are no shortcuts with white unless you want to end up with poor blends and chalky looking highlights.
Applications:
Shading with multiple colors to add depth and complexity to shadows

When you are adding tints to shadows to slowly built them up, you don't have to use the same color over and over, in fact using multiple colors can add significantly to the miniature. The two examples above show how this can be used for skin, however it's outstanding when used on cloth or on nmm (or other "hard") surfaces as well.
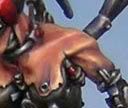
the first image shows shading with both reddish brown (dark flesh) and bluish grey (shadow grey) in order to add complexity and depth to skin and to show bruising around the cybernetic parts
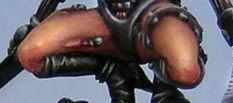
The 2nd image just shows adding both blue and green shadows to skin to get a more complex shading effect.
Starting with a VERY dark basecoat
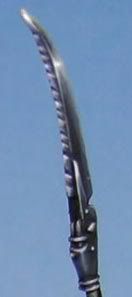
Starting with a very dark basecoat and only building highlights can be used to create a very dark look to a miniature while still defining the area with effective light tones. In this photo the blade is a black basecoat, first built up with shadow grey, then finished taking it all the way to white
Reflective Cloth - Satin or Silk

Satin or silk has a unique property of being both very reflective, yet defuses light since it is still a woven cloth. As seen in this photo the method here was using a base coat and then using this technique to highlight with white immediately with no color between. The result is a blend stright to white (suggesting a reflective material) however with some of that white difused to suggest a woven cloth.
Subtle hot spots on "soft" surfaces
Since you are adding highlights so slowly it makes it much easier to create subtle hot spots on surfaces such as skin where you do not want to take the highlights all the way to white, however using white in subtle ways to add highlights gives that extra layer of depth. In this photo only a very few layers of extremely thined white were applied to her thighs, and while it does not change the color of the skin tone significantly, it does add the illusion of a hot spot and external light source (much like what makes NMM believable) but done so in a much more subtle/defused way as to suggest a soft non-reflective surface.
-
PERHAPS, nathan is just having a hard time accepting his kids are smarter than him?
Although they are sounding just as stubborn


New miniature company - Black Scorpian Miniatures
in News, Reviews, & Discussion
Posted
I totally didn't even see the girl on the base...she seems VERY small, I'm not sure I like her their either