

Big Ned
-
Posts
741 -
Joined
-
Last visited
-
Days Won
1
Content Type
Articles
Profiles
Forums
Gallery
Events
Downloads
Posts posted by Big Ned
-
-
I'm a big fan of Sarissa. The Old West Heroic range are certainly the best in terms of scale (a bit bigger than 28mm) and flexibility. The City Block range is also very good and fits the Malifaux town concept very well. I've just built the warehouse and intent to turn it into an illegal gambling den for Lynch. Finally, the Adobe range as also good, and would pack away well, especially if you need to transport your scenery.
Seconded.
I can't recommend Sarissa enough.
Here's my collection

That's a mix of mainly smallplus and mediumplus with some other special buildings.
-
Stunning... just stunning
Every models individually is excellent and when together you can see how you have used the purple consistanly though the crew to tie them together.
Well done.
-
Very nice.
I'm impressed that you've mananaged to get a uniform theme throughout the crew without it looking same-y.
Very well done.
-
I'd love to see a plastic Nekhima. The only thing putting me off that model is the fact that it's metal and would be too unwieldy to transport anywhere.
-
My main goal is the same as 2012 :- Paint more models than I buy. (2012 achieved! -41 bought vs. 46 painted)
My secondary is to buy/build/paint Mei Feng's raild crew + the rest of the book 4 arcanists.
-
I thought about going the magnetised route too.
But I decided against it as I wanted to do a basic guide that would give people a basis for them to build off of, such as using base inserts or magnets ;-)
-
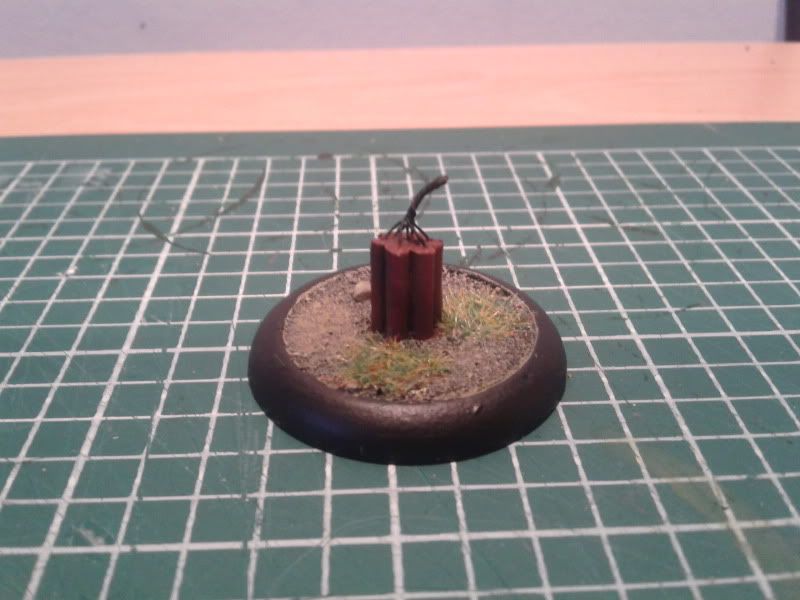
Making cheap, easy and effective dynamite counters.
By Nate Zettle
Hi guys,
I’ve been working on a little project in my free time for the last week and, as I often do, have done a little write-up on how I did it in case others might want to do it to.
This project (as you may guess from the title) was making some dynamite counters for Malifaux, mainly for the ‘Line in the Sand’ strategy, but also for Willie’s set charges (although when I make those I plan to use much more dynamite.)
As with many of the guides I have written in the past on different forums and magazines I’ve not started out looking to reinvent the wheel but rather give people ideas on how to make effective terrain/gaming aides without breaking the budget.
I particularly proud of these because I think I’ve managed to tick all three boxes of the elusive hobby triangle. These counters are:-
- Cheap to make
- Easy to build
- Look great
So enough of that, here’s our finished product.
If you want to make these you will need.
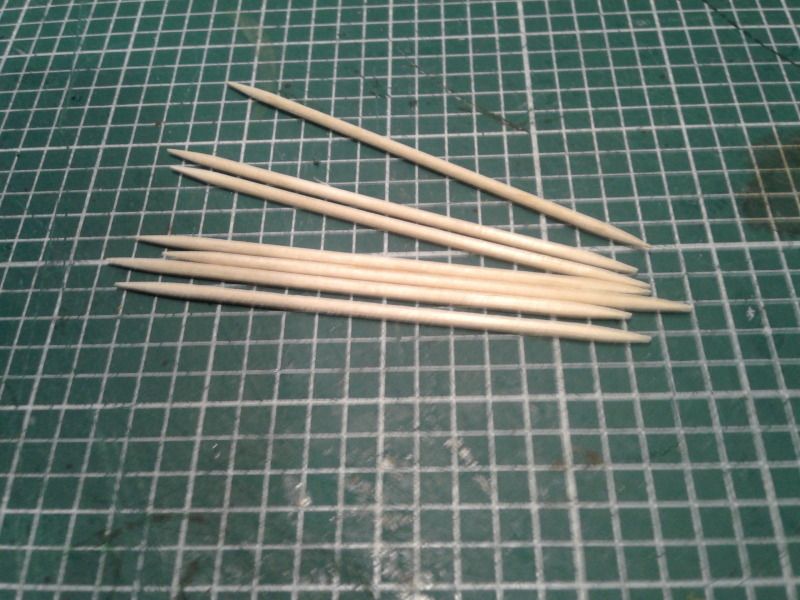
14 toothpicks/ cocktail sticks
10 round lip 30mm bases
1 sewing needle
1 thimble
Thin gauge wire (I used 5A fuse wire)
Sand
PVA Glue
Super glue
Various paints
Razor saw
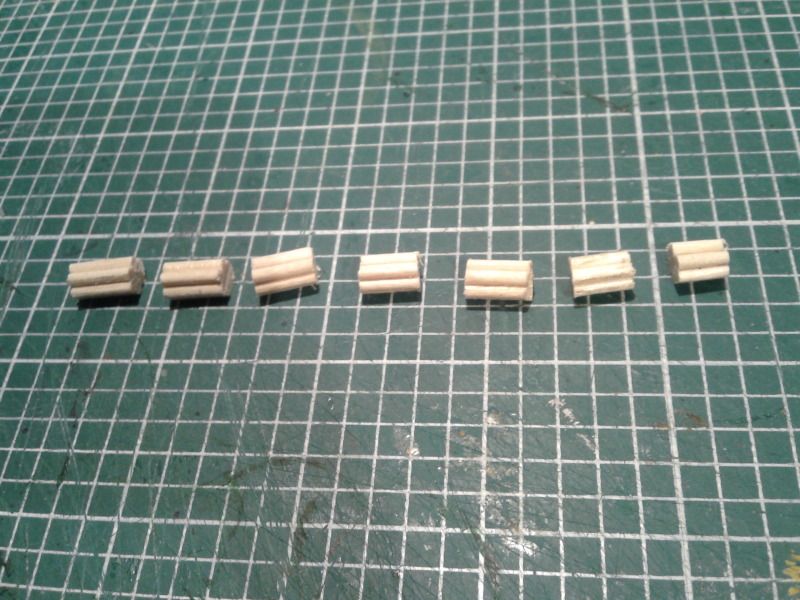
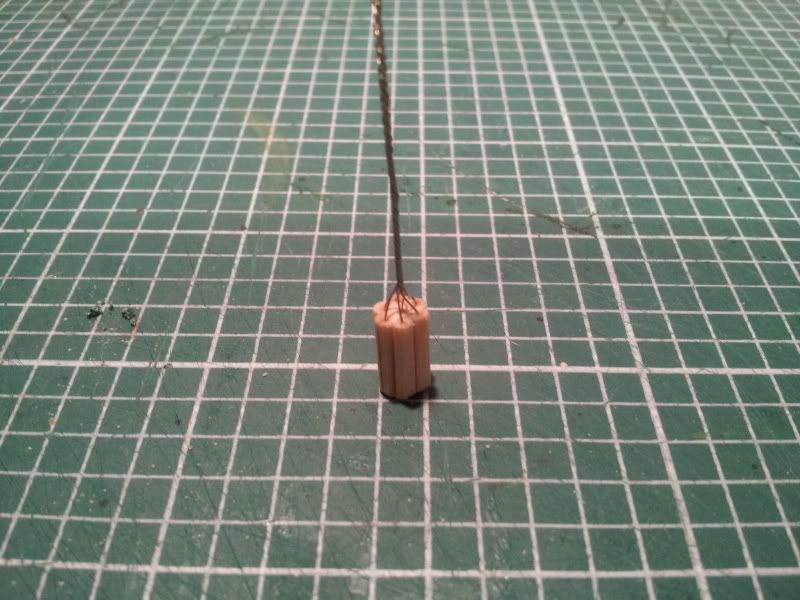
Step 1
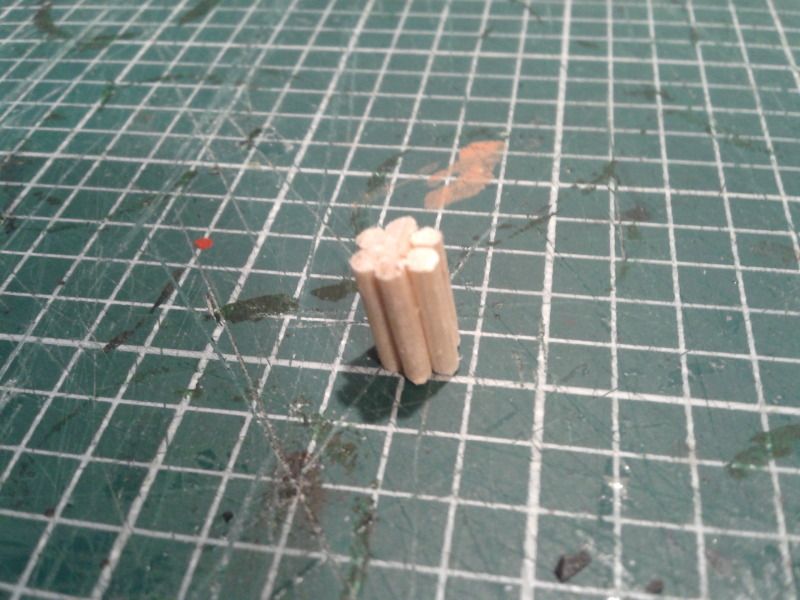
Take seven tooth picks and give them a coat of PVA glue. Then bundle them together so that six toothpicks surround the seventh in the middle (kinda making a flower pattern). Wipe of any excess glue with a damp cloth and leave this to dry. And repeat.
Step 2
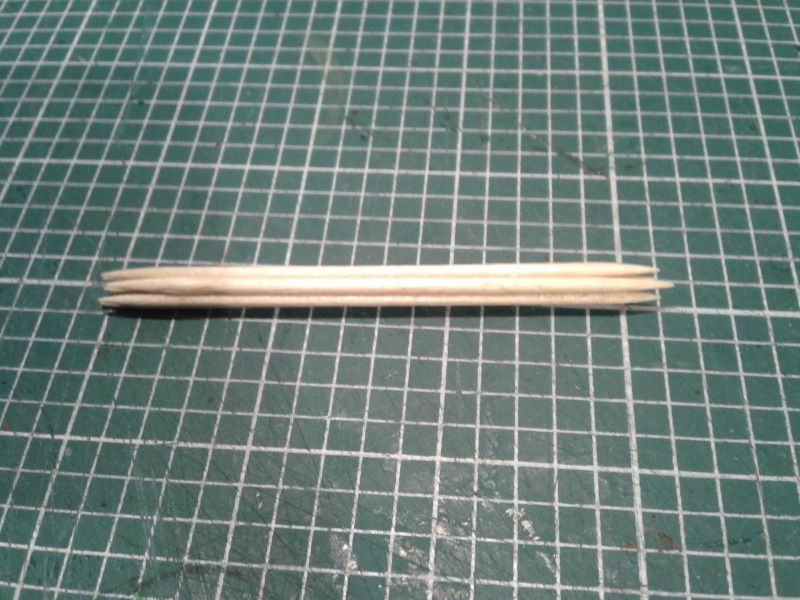
Once the glue had dried it’s time to get cutting. Mark off the ends of your toothpick bundle and then mark off equal lengths along the tooth picks. I used lengths of 1cm and this gave me seven lots of dynamite from each bundle.
After you have made your marks use a razor saw the toothpicks into 1cm long bits. Take care when you’re doing this step as the toothpicks may splinter, only gently pressure is required to cut through.
When you’ve done that you should end up with something like this.
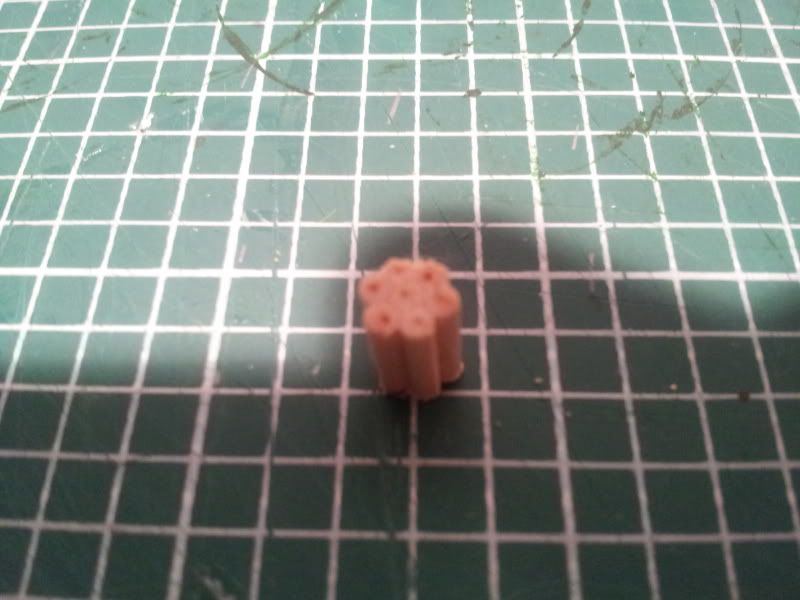
Step 3
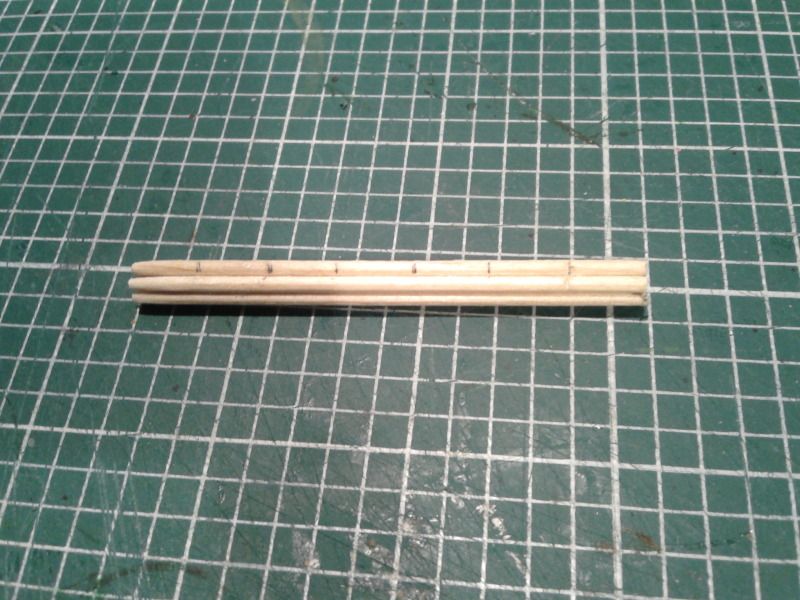
With that done it’s time to get your sewing needle and thimble. Take the needle and push it in the end of each of the seven dynamite sticks to the depth of about 2-3mm. I recommend a thimble for this step as you may need to push in pretty hard.
This’ll give you some nice slots to insert you fuse wire.
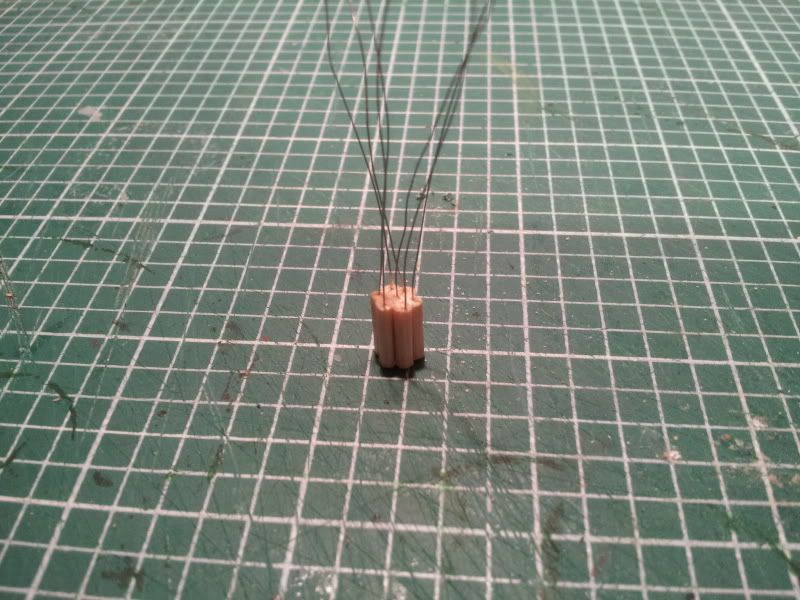
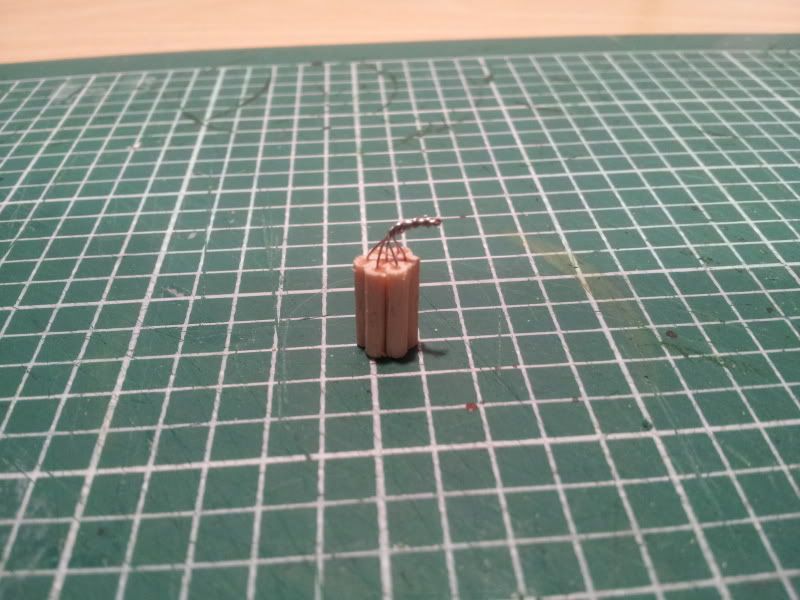
Step 4
Now cut yourself some lengths of wire, I recommend cutting the lengths at about 3cm. This will leave you some waste but the pieces will be easier to manage. You’ll need 98 lengths in total so it might take a while. I did it while watching TV as it’s not really something I had to concentrate on.
With you wire cut, dab a bit of superglue on one end and stick it in the hole at the end of your dynamite. I recommend doing the stick in the middle on the bundle first, it makes it so much easier.
Step 5
When that’s dry (and I would give it a good hour of so to dry fully), pinch together all seven bits of wire at the end and twist them all together.
Next, bend the wire into a more natural shape and trim of any excess you don’t want.
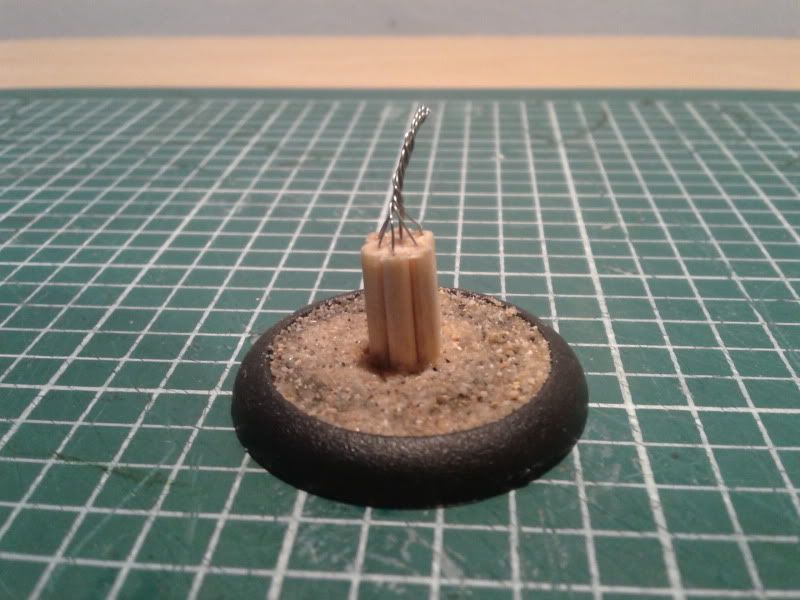
Step 6
Take your bases (preferably unslotted ones, or you’ve have some filling to do) and give the recessed bit a good coat of PVA glue. Stick your bundle of dynamite in the middle and sprinkle sand over the rest.
Step 7
When they’re all dry, prime them and paint them however you feel appropriate.
I did ten in total: - five with black rimmed bases and five with red rimmed bases to represent disarmed and armed counters respectively.
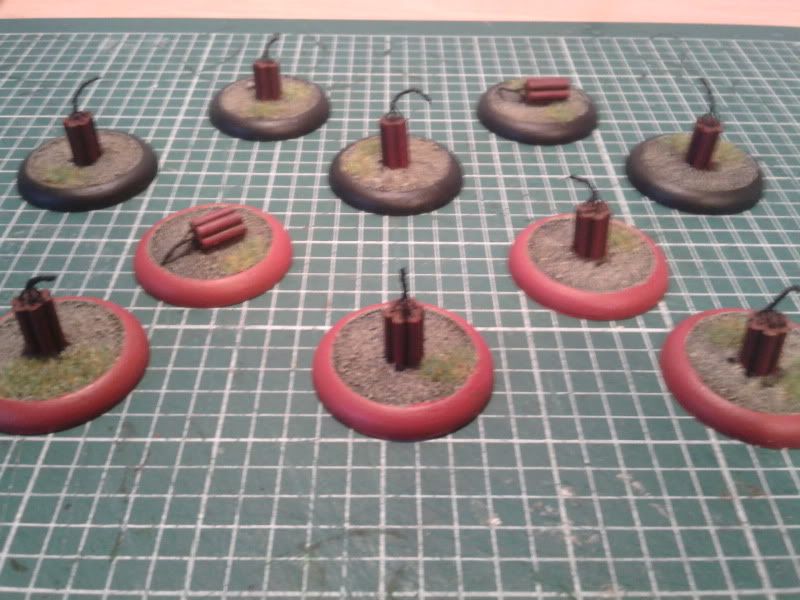
I did toy with the idea of green stuffing a little flame on the end of the armed dynamite but decided against it in the end on account that I suck at sculpting.
Right, well if you got this far, thank you for bearing with me. I hope this little guide has been helpful and given you some ideas.
These counters don’t take long to do (I couldn’t tell you how long exactly thought) and look great on the table.
So there you have it.
Bye
- Cheap to make
-
Looking good, whats next for the crew? maybe some Oiran
Thanks, I've taking a break from Showgirls for the time being and I'm gonna tackle the Rail crew in the new year.
-
Wow!
Your blending is out of this world!
Those crews are all superb but, the Raspy crew takes the cake for me. The colours just go together so well throughout the crew.
-
Thanks guys.
Like I said the pictures are unflattering but the best I could do. My camera isn't great and seems to have blocked out the colours. the blending is much smoother in real life. smooth blending is something I pride myself on.
I omitted the close-up pics of the two performers as they look terrible in their close-up pics. even my wife (who doesn't game/paint) commented on how blocky the highlighting looked in the pics.
I'm really happy with the crew and appreciate all the positive comments.
Thank you.
-
Hi guys, I've been on a bit of a painting kick for the last few months and I've gotten my showgirls painted up.
So, I thought I'd post some (unflattering) pictures of the finished crew.
The whole crew

Colette

Cassandra

Angelica

Mannequins

Coryphee


Doves

Hope you like them
Thanks for looking
-
Really?
Most B&Q's esp. thr larger omes offer a free cutting service.
Might be worth having a look on their website for the closest superstore to you.
-
That is very cool.
I think it captures the feel of Malifaux perfectly
-
I just got £100 worth of stuff from them a few weeks ago. (old west heroic). I'm pleased because had they announced this stuff then, then my order might have been somewhat bigger.
-
Ooooh that looks like it's going to hurt.
Brilliany conversion idea
-
Cool something to listen do while I do overtime at work. thanks Bill!
-
Those eyes... Wow!
Very nice throughout the model,
I'm also especially liking the way you did the blonde hair.
-
Thank you for the offer, but I'm sorted now thanks to Huang Da Wei
-
Received the replacement today.
Thanks guys.
-
Great!
PM sent.
-
Hi guys,
I'm after a coryphee © stat card. (the crouching one).
I bough two packs of coryphee (for individuals and a duet) and I had all he stat cards to go with them.
Now, possibly due to my 3 year old son I'm missing not one but BOTH of my crouching coryphee stat cards.
I was hoping that someone had a spare they'd be prepared to sell.
I was planning on picking one up from the online store but postage to the UK would be a killer ($16.50 flat rate for some reason).
Thank you
-
Thanks, I knew they had Gencon to deal with.
I was more concerned that the request hadn't gone through.
-
Hi guys,
I reported the my Levi was missing his sceptre hand through the website about 3 weeks ago. I got a confirmation page up on the website but no email.
Is that normal?
But, my main question is, How long do replacements typically take to be delivered?
Thank you
-
Good job, can't wait to see what you do with the rest of the crew.
Thanks guys.
The rest of my Guild will be a while off yet.
I painted my peacekeeper because I fanicied it really, I'm planning on getting to work on my Showgirls first (fewer models to paint for a complete crew
 )
)Anyway keeping the tarnished brass theme here's some mechanical doves I've finished today.


 )
)
The Miners and Steamfitters Union Strikes!
in Miniature Showcase
Posted
the only reason I won't be doing this myself is that my Kaeris isn't painted yet.
That's a stunning model.
I love what you've done with the metal gamin and I'm quite tempted to steal the idea.